DIY Quilt Label - How to Create a Custom Quilt Label

When I first started quilting, I remember hearing rumblings about the importance of labeling your quilt. I even recall attending one of my first Modern Quilt Guild Meetings with the Montreal chapter and presenting my first ever quilt and as I was walking back to my seat several members mentioning how I just needed to label her!
To be honest, I already felt a little overwhelmed by the quilt making journey and felt daunted by the thought of an additional step. Lazy, perhaps, but that’s really how I felt! You may have felt similarly at some point too 😉
But the message stuck and I went on to spend A LOT of time researching quilt labelling options.
Sign up to download the free Quilt Label pattern.

*This post contains affiliate links, meaning, at no additional cost to you, if you click through and make a purchase, I may receive a commission.
My personal criteria for quilt labelling needed to:
- Be easy to pull together
- Fit in with the overall look of the quilt design
- Be easy to pull together 😉 Did I mention that?!
Quilting is supposed to be fun, so I’m not looking to get bogged down with steps that I don’t enjoy. But, I also recognize the value in adding a label.
- It lists all the important details of the quilt (more on that in a minute).
- It reminds me of what I’ve made – I’m getting older and it is amazing how time seems to blend together.
- If the quilt is gifted or sold, it tells the recipient the important stats of the quilt and who made it.
- It adds a pretty and personal touch to your final handmade quilt.
So, those are my reasons for adding a label to all my quilts.
HOW TO DESIGN A QUILT LABEL
After tackling a few quilt labels, I’ve actually come to love this step! Who knew?!!
I would have never guessed it would become a favourite step in the quilting journey. I now find myself thinking about the quilt label while I’m cutting fabrics for my project and/ or while piecing. Since I like to set my quilt project fabric scraps together in a pile, it becomes easy for me to sift through those little snippets for inspiration.
I typically use the quilt label as an opportunity to play and try out new designs, albeit on a small scale.
I love a good improv session, so I guess it’s no surprise that for my Plus Infinity Quilt, I opted to go with a modern improv quilt design. After sticking with the pattern on the front, it was nice to let loose and just experiment with the pretty colours.

Shown above is the Plus Infinity Quilt - pattern available in the shop.
But there are lots of other design approaches you can use too.
- Practise simple patchwork.
- Try a block out in a mini version to see if you like the design.
- Play with colour placement and combinations to see if they would work on a larger quilt.
- Go with a simple solid.
- Go with a simple solid and add embroidery.
Really, the sky is the limit and it’s all about exploring your own creativity.
One of my favourite quilt labels was made using one print from the Playground Collection that I fussy cut to fit with the “playful” theme of the Playtime quilt. Isn’t she cute?!!

Shown above is the Playtime Quilt.
MATERIALS NEEDED TO MAKE A QUILT LABEL
There are some key materials that you will need to tackle your own quilt label.
- First up is fabric!!! I like to use fabric from the quilt project, but you can use any fabrics your heart desires. This is a great project to raid your fabric scrap stash!
- *Freezer paper. You should be able to find it at your local grocery store. I had to go to a few before finding my roll.
- *Sharpie Ultra Fine Point Permanent Marker
- Light weight *interfacing
- *Clover Slim Hera Marker
- Thread (*Aurifil 50wt is my go-to) and *needle for attaching your label.
- Thread conditioner - this helps your thread glide through the fabric so it doesn't snag and tangles less.

HOW TO PREPARE YOUR QUILT LABEL FOR WRITING
Once I have my quilt label pieced, I now need to prep her to be written on.
What? Write on my label?! Yes, it works!
I’ve tried using my ink jet printer to print out my labels, but I’ve had mixed success with this. Either my fabric somehow becomes a “paper jam” and gets all wrinkly or I’ve had ink smudge on other areas of the label making for a less than crisp outcome. Plus, when I changed printers it just wouldn't feed the fabric properly. So, to avoid this frustration, I moved onto writing on my quilt labels.

To make the writing process go smoothly, I always start by backing my quilt label with freezer paper. This is the same first step you would use for using a printer (i.e. the freezer paper helps stabilize the fabric to get it through the printer). But I’ve found it beyond helpful when writing the details out by hand. Before I tried it, I noticed the pen didn’t move as smoothly over the fabric and it would get caught or the fabric would wiggle around, producing a wobbly written message.
*Freezer paper is super easy to use. AND it’s reusable!
All you need to do is cut a piece that is large enough to accommodate the full size of your label. Iron it to the back of your pieced label, making sure to place the label wrong side touching the shiny side of the freezer paper. Also, make sure to iron with the right side of the label facing down (i.e. with the mat back of the freezer paper facing up). Otherwise, you will get sticky stuff all over your iron…and no one wants to have to clean that mess up!
And, voila, you have a nicely stabilized quilt label ready to be written on.
WHAT DETAILS TO INCLUDE ON YOUR QUILT LABEL
Now, what are you supposed to include on these labels? Well, that’s really entirely up to you. But, here are the stats I include:
- The name of the quilt
- Who designed the quilt pattern
- Who quilted the quilt
- The month and year it was made
- Where it was made
Note – most of the quilts I make are designed and quilted by me, so I typically write “Designed and quilted by”.

Pictured above is the Spring is in the Air quilt - pattern available in the shop.

Pictured above is the 100-Day Quilt.
Here is an example of a quilt label for a quilt I made using a pattern.

Pictured above is the Cats in Boxes Quilt
You can also take the opportunity to include some personal details. When I’ve designed or made a quilt specifically for someone, I like to include a personal touch in the label.

WHAT DO I USE TO WRITE ON THE LABEL?
I’ve tried a few different options here - regular Bic pen, Micron pen - and I always come back to an ultra fine tip *Sharpie. Really! it works!
Once I have everything written out, I set the ink with my iron.
That’s all there is to it!
HOW TO PREPARE YOUR LABEL FOR ATTACHING TO YOUR QUILT
Ok, now that we have a nicely pieced and marked up quilt label, you’re probably wondering how to attach it to your quilt.
Well, first, you need to start by peeling off the piece of freezer paper! We don’t want that getting included on your quilt 😉

At this point, you could just iron back a seam all around the perimeter and attach it by hand, but I find that too fiddly.
So, my go-to is to back the quilt label with a piece of interfacing. Nothing too heavy weight. I am simply using it to enclose my seams. I also like interfacing that has a little adhesive on one side so I can iron it in place on the back of my quilt.
Start by cutting a piece of interfacing the exact same size as your quilt label.
Place the two pieces right sides together and stitch a ¼” around the entire perimeter.
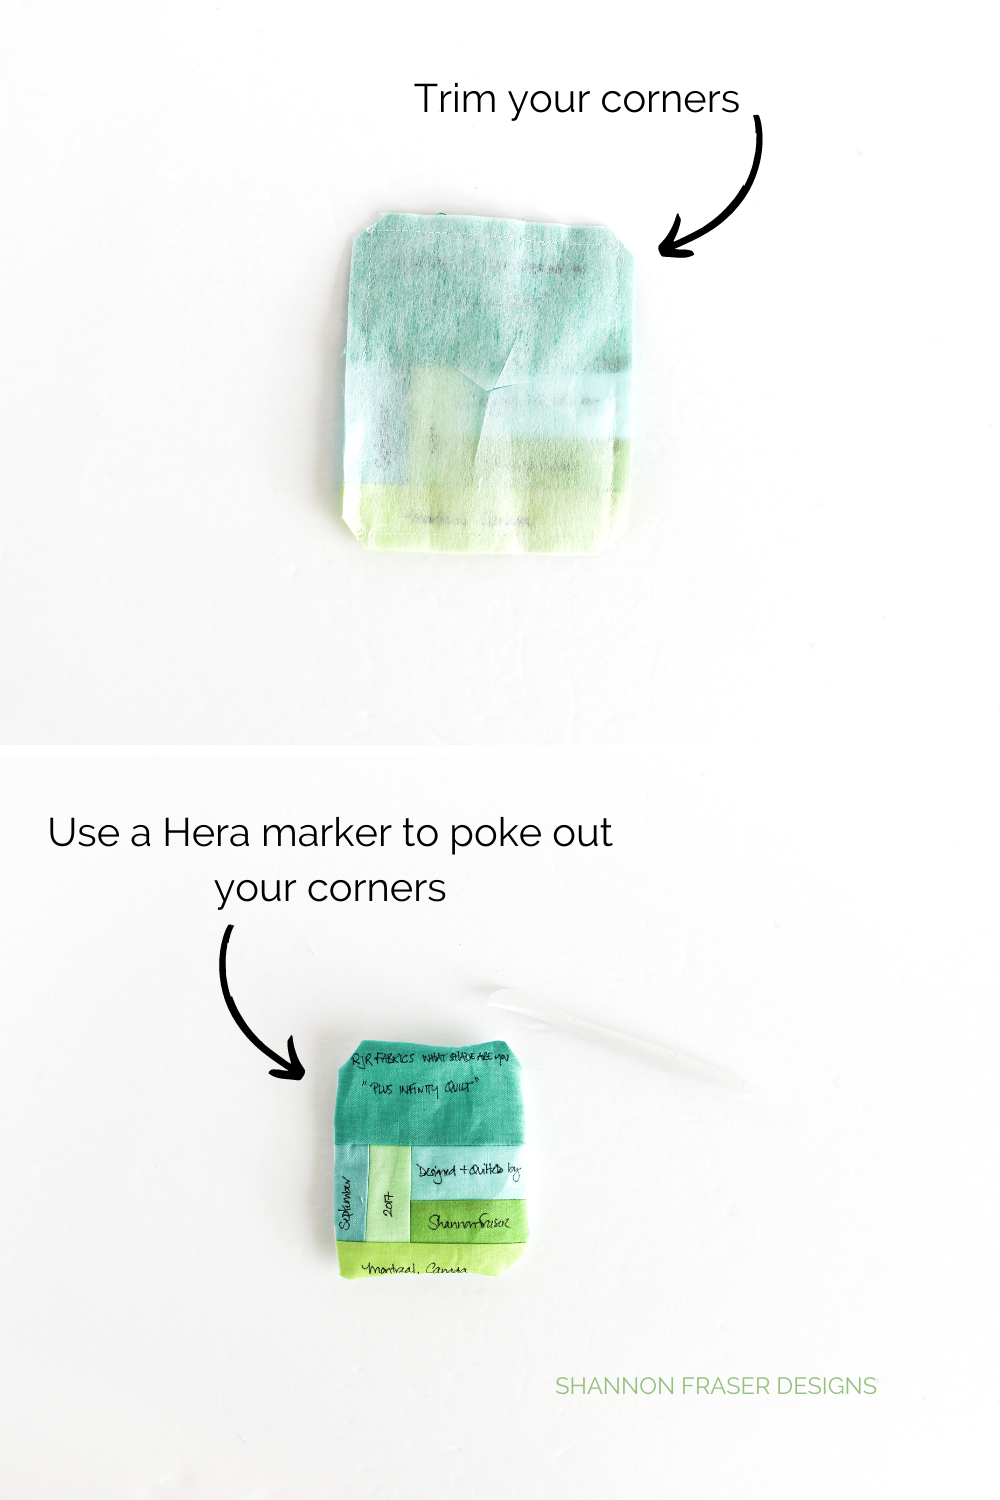
Pull the interfacing away from the quilt label and cut an X in the back. Then flip the quilt label right side out.

Use a *Clover Slim Hera Marker to poke your corners out for nice crisp corners
Since I normally have the sticky stuff on the back of my interfacing, I iron everything out directly onto the back of my quilt.
I then blind stitch it in place – using the same stitch technique I use for hand binding.
And there you have your very own personalized and unique quilted quilt label!

How easy is that?
And, the best part is, the more you do it, the easier it gets. And it will just become a natural part of your quilt journey. So much so, your quilts will feel naked without one 😊
Have fun with this. Be creative. Show your personality. Include a cute message. Whatever your heart desires, this is your way of signing your quilty masterpieces!!
I would love to hear about your quilt label tips and tricks. Share them in the comments below!!
Happy quilting!
xo
Shannon
_________________________________________________________________________
Never miss a post - sign up for the weekly newsletter.
This post uses affiliate links. For more info, visit the FAQ page.
All my quilts are labeled and I vary the label style. Sometimes I use fabric printer paper and use various emojis to decorate the label. Then I use a decorative stitch to a piece of fabric from the quilt and hand stitch it in place. Sometimes in make a narrow picture frame like border around and hand stitch in place. My writing is not so good but I live the uniqueness of your label so that’s going to be my next one. I”’m going to try fussy cutting of a fabric design, great idea! I think the label is just as special as the quilt, personalizing it to the recipient.
I try to have my label ready before sewing on the binding. I will put the label in the corner and pin it to hold it, then use my machine to sew the 2 sides on. Afterwards I will handsew the other 2 sides down to secure it.
Thank you for making this post. I never thought of using scraps of fabric from the quilt to make a label. I never made labels, when I first started quilting. I do now. Thanks for the reminder.
Hi Shannon great tutorial!
I have always labeled my quilts – taught by my mom 35+ years ago!
So much love goes into each quilt and as I work on them I am constantly thinking of the person they are being made for. Stories, memories and dreams for this person come to mind.
Some of these make it to my labels that not only include the pertinent information but a ‘story’ specifically for that individual.
Lol more times then not, by the people that know me, the label is read before the quilt is loved!