You’re amazing!
We’re blown away by your enthusiasm for the 30 Days of Improv Quilt Along!
Clearly you have a mutual love for working without a quilt pattern as Amanda (aka @broadclothstudio) and I have 😊 And it's been so fun seeing you connect with your wonky side!
*This post contains affiliate links, meaning, at no additional cost to you, if you click through and make a purchase, I may receive a commission.
Last week was all about fabric selection and getting into the improv mindset. This has laid a good foundation for you to build from as you dive into the first shape to explore – squares.
While squares are uber basic, they also offer lots of room to play.
All the fun tips and tricks are shared with you in the weekly email (sign up here to join in!) but I wanted to round-up my improv blocks to give you some inspiration as you dive into your first weekly challenge.
Taking that first cut is always a little nerve wracking. Pristine yummy fabric will do that to you 😉 But, it’s also super liberating! So, don’t dwell and just cut!
I always recommend keeping it simple when you’re first diving into a new project and I took my own advice. Here’s the little beauty I stitched up on day 1.
I was getting revved up and wanted to zoom in on some itty-bitty stitching details. Sometimes you need to ease your way into a project.
Slicing and dicing is the name of the game, and I didn’t hold back! I also love how I omitted the pink in this one so that you can see how the greens play differently off the Plum Preserve. Colour play and slicing & dicing – sew fun!
I wanted to play a little more with scale and focused on incorporating bigger squares and smaller ones to see what shapes would emerge.
I had some smaller pieces that were trimmings from previous day’s blocks, and I worked to incorporate them with a ‘waste not, want not’ mindset.
Here’s everything I used to create my improv blocks for Week 1:
There’s still plenty of time to join the improv QAL and tune into your inner wonk. Sign up for the free challenge here and get all the improv tips sent straight to your inbox.
Can’t wait to see your improv blocks hit the ‘gram under the #30DaysofImprovQAL hashtag.
xo,
Shannon
_________________________________________________________________________
Never miss a post - sign up for the weekly newsletter.
This post uses affiliate links. For more info, visit the FAQ page.
Did you ever think you’d amass enough sewing thread spools to warrant considering storage solutions for them?
Neither did I!!
But if you’re reading this, then you probably find yourself in need of corralling and taming your ever-growing thread collection.
And that’s what today’s post is all about – finding clever, practical, and pretty ways of storing your sewing and quilting threads so they’re easy to access when you’re in need of them.
I’ve shared before that I don’t have a full-on sewing room and space of my own. Living in the city means space is at a premium and I don’t have the luxury of having a full dedicated space for my sewing stuff.
When I first started sewing and quilting, I was able to keep my ‘sewing stash’ to a box. Then a shelf. And before I knew it, I had to invest in a full cabinet to store my fabric and sewing notions.
As my creative outlet also became a business venture, the amount of ‘stuff’ I started to accumulate was getting a little overwhelming. And that’s even with my approach of ‘less is more’ when it comes to all the quilty notions I could be stocking in the studio.
But one notion that I do love having on hand is thread.
It’s an essential part of any sewing or quilting journey and, over the years, I’ve found it to be a very inspiring part of the designing process. Since I love switching up the fabrics I work with, that also means I love having matching or coordinating colours on hand to pick from.
So, what’s a quilter to do with all those spools? Here are some nifty ways to keep them organized and accessible.
*This post contains affiliate links, meaning, at no additional cost to you, if you click through and make a purchase, I may receive a commission.
Since I stitch at the dining table and also film all my videos from there, I thought it would be fun and practical to hang my *thread rack up on the wall next to my design wall (click here for a DIY tutorial to make your own design wall). Not only do I find it super pretty, but I love how easy it is for me to grab a spool and load her in my sewing machine. This is especially true when I’m working on a project that features more than one thread colour.
Here’s a couple examples of quilts featuring different thread colours:
You can always opt to paint the wooden thread rack, or, if metal is more your thing, I found this *black metal version that looks nice and sturdy.
Whenever I’m lucky to get my own sewing room, one thing I plan on incorporating is a drawer lined with a thread rack. This just looks so easy to maintain and access, which are key features I look for in a storage solution.
My friend Ali from Arabesque Scissors (catch her interview in What’s in Your Sewing Bag Arabesque Scissors) has one in her sewing room, and it just looks so functional! Plus, she’s sharing a step-by-step tutorial on how to hack one for your own sewing space!
Picture courtesy of Ali from Arabesque Scissors.
There is no shortage of storage boxes out there for you to choose from. I’m sharing just a couple here with you, but I encourage you to check-out your local craft, dollar, or thrift store to see what you can find.
You could pick-up some plastic cases that are specifically made for thread storage.
There’s this *double decker one.
There’s also this one specifically designed for *embroidery thread.
I don’t have either of these, so here’s what I’ve been using.
I got my first official *Aurifil Thread case when I was an Aurifil Artisan for the first time in 2019. I’ve since gone on to acquire 2 more with each subsequent year that I’ve been an artisan. These are great for storing your larger Aurifil spools. I’ve also used one for storing my cut-up *Kona Cotton Color Card, which has been super handy.
The other storage boxes that I rely on are my empty *Ferrero Rocher chocolate boxes! Yes, repurposing old containers is a great option for thread storage! I pick these up annually at Costco leading up to the Christmas holidays. It’s my go-to treat that time of year, which I shared with you in this Canadian Virtual Trunk Show episode.
These *clear acrylic storage drawers would be perfect for embroidery thread or smaller thread spools.
What I love about them is that you can get so many small and large thread spools tucked inside. The lids mean they’re stackable and they fit nicely on my Ikea Billy bookcase shelf!
I’ve also used cookie tins, make-up tins, essentially if it’s a tin and the right size for my sewing notions I consider them fair game! 😉
Clothespins might not be the first thing you think of when it comes to thread storage, but if you like working with embroidery floss, then this might just be the ticket. My quilty friend Cheri from @tinkerellen , was inspired by Kari Lockhart of @ohmyheartembroidery to create the most gorgeous handmade board of embroidery floss.
You can find Cheri’s adorable embroidery patterns in her Etsy shop.
Picture courtesy of Cheri from @tinkerellen.
What is it about baskets that they always seem to be so handy for corralling odd bits and bobs?
I have an older wicker basket that I believe a gift came in that I repurposed for storing all my pearl cotton thread in. I’m actually running out of space and will need to invest in larger ones as my collection keeps expanding 😉
Here are a few that I found that would do the trick:
The one downside of baskets is that dust can accumulate.
This isn’t a problem for me as I keep mine stored in my cabinet, but something to keep in mind if you plan on leaving your basket out on display.
If you want to have your pretty thread on display but want to keep the dust from settling in all those fibers, you can take a cue from Anna Maria Horner and store them in glass jars with lids. I’m also inspired by her embroidery thread hooks that she DIYed herself. Read more inspiration in her Color and the Keeping of It blog post.
Picture courtesy of Anna Maria Horner.
For storing my Aurifil Thread cones, I like to keep those on a shelf in my cabinet. I haven’t picked up a *cone thread rack, so for the time being I’ve been storing my Aurifil Thread cones on a shelf in my fabric cabinet. It’s on the same shelf as some books and my old Singer sewing machine.
This keeps them stored out of sunlight, but still easily accessible.
You could always opt to have them displayed on an open shelf in your sewing room too!
There’s lots of ways to make storage solutions work for you and I bet you have a ton of options already sitting in a cupboard somewhere. Repurposing old containers is a great way to save our landfills and also keep your pretty threads neatly organized 😊
For more thread inspiration, check out:
In need of some help organizing your fabric scraps. Take the FREE 7-Day Scrap Sorting Challenge and tame your scraps!
What’s your favourite way to store your thread?
Happy organizing!
xo
Shannon
_________________________________________________________________________
Never miss a post - sign up for the weekly newsletter.
This post uses affiliate links. For more info, visit the FAQ page.
Did you hear?
You’re invited to some end-of-summer improv fun!
My quilty friend Amanda (aka @broadclothstudio) and I were chatting, and we got to talking about stitching together.
Nothing too serious.
Nothing too entailed.
Just let loose and have some fun stitching on the daily. You know, some ‘me-sewing’.
We both have a love for improv and since I know you’ve been wanting to explore that technique more, we thought why not invite YOU to join in the improv quilty shenanigans 😊 After all, sharing is caring!
*This post contains affiliate links, meaning, at no additional cost to you, if you click through and make a purchase, I may receive a commission.
To help make this as easy breezy as possible (cause it’s summer and it’s hooooot), we’ve planned out 30 Days of Improv chock full of tips and tricks to get you into the improv mindset.
Whether you’re dipping your toe into the quilty improv waters for the first time or have been swimming wonky laps for awhile, this laidback quilt along is just the ticket to tune into your creative side.
The best part?
All the details are sent straight to your inbox by signing up here.
Once you sign up, you’ll get a welcome email with all the improv challenge details and then a weekly email with the shape of the week and the daily prompts to help guide your exploration.
Plus, there’s some fun prizes to win along the way from our amazing sponsors!
Tips and tricks + weekly prizes = yes, please!
Sign up here to join the improv fun.
The quilty fun kicks off the week of June 25th with some fabric planning.
Fabric selection can be a tricky process, which is why Amanda, and I are sharing insight on how we picked our very own fabric bundles in the kick-off email.
Here’s a peek at mine:
Once you have your fabrics selected, you’ll pull out your cutting tool of choice and get ready for the first challenge to hit your inbox on August 1, 2021!
Sign up here to get in on the free quilt along.
Can’t wait to stitch together!!
xo,
Shannon
_________________________________________________________________________
Never miss a post - sign up for the weekly newsletter.
This post uses affiliate links. For more info, visit the FAQ page.
Keeping a well stocked sewing kit is a surefire way of making your quilting more enjoyable.
Why is that?
Well, for a couple of reasons.
First, there’s nothing that kills my sewjo more quickly than having to hunt for a needed notion. A project will quickly come to a screeching halt if I have to spend time looking for a tool or, worse, have to head to the store and pick something up. Sound familiar?! Keeping all your essentials in stock means you never run out. Keeping them organized in your sewing bag, means you never have to hunt for them, you know exactly where they are. Which ultimately means you have more time for sewing!
Second, knowing what notions work the best for your quilting style and sewing projects is key to ensuring you don’t get bogged down with a bunch of useless notions that don’t do what you need them to do. I love that today’s What’s in Your Sewing Bag guest touches on this point!
You know that feeling when you first meet someone, and you instantly jive with them? That’s exactly how I felt when I fist met Michelle Bartholomew. She’s just the sweetest! We connected on Instagram and have been encouraging one another in our creative quilty pursuits ever since.
Way back in 2017, early in my quilt journey, Michelle invited me as a guest for her Quilter’s Spotlight newsletter series. I felt so honoured to be included and couldn’t miss the opportunity to return the favour 😉
One of the best parts about having talented quilt friends is getting to follow along on their creative journey. A project that I’ve loved following along is Michelle’s Clara Milestone Medallion quilt. She started this when her daughter was born and I’ve so loved seeing the progression. I haven’t tackled a Medallion quilt, never mind a Milestone one, but seeing hers has definitely put the quilt design on my radar.
If you love colour and sewing projects stitched up with intent, then you’re going to love today’s What’s in Your Sewing Bag guest!
*This post contains affiliate links, meaning, at no additional cost to you, if you click through and make a purchase, I may receive a commission.
Introduction – tell us a little about yourself! How did you get started on your quilting journey?
Hello! My name is Michelle and I’m a designer, photographer, and quilter. I’m also a mom to two girls (6 and 2), so I’m often finding myself with time to sew only while I’m on the go with them! I’ve been quilting for about 8 years. It all started when I turned 30. I decided to make a list of 30 things I wanted to do the year I turned 30. One of the things I wrote on the list was “make a quilt”. I had never really even sewn before but had always admired the art and usefulness of quilts and wanted to give it a try. I made a simple top with rectangles that I had admired on Pinterest. When it came time to quilt it, I was so intimidated by quilting with my machine, I decided to hand quilt the whole thing! Fortunately, I enjoyed that process or that might have been my first and only quilt!
What a cool start to your quilting journey, Michelle! I often hear of people making these ‘bucket lists’ but I don’t always hear about the follow through 😉 That’s super nifty that you not only stuck with your goal, but also dove into hand quilting your very first quilt. Talk about taking a deep dive into the quilty world – I love it!
What kind of sewing bag do you have? (e.g. did you make it? Buy it?)
Maybe this is cheating, but I have 2 sewing bags that always travel together. One holds supplies, like needles and thread, and the other holds tools for cutting on the go. I made them both. For the first, I used the Goody Goody binding kit tutorial from Lella Boutique. I made a few modifications that are perfect for the way I work, but it’s pretty close to the original pattern. The other is self drafted with plans to refine and make it a little more functional now that I’ve used it awhile.
Ha! We twin, my friend! I tend to carry two sewing bags with me too! One for all my notions and the other for all my thread (so that it doesn’t get tangled with all my notions). I hadn’t heard of the Goody Goody binding kit, but it does look super practical. Plus, yours is just a cutie!
What are your all-star essentials? Your tried-and-true must haves that you can never run out of?
I always have my *Sewline glue pen handy (and *refills! I get a little nervous when I’m down to only 1 refill in my bag). I’m not picky on needles but I have been enjoying my *Clover Gold Eye needles a lot lately and have a good amount of them in my needlebook. I also really love my *foldable Fiskars scissors that are great for plane travel. They are adorable, cut well, and I love that they fit perfectly in the tiny pocket of my sewing kit. A few other things I find myself reaching for often are my *Hera marker, *chalk roller wheel, and *thin glass head pins (all from Clover). Lastly, a magnetic needle minder always comes in handy. Before I attached one of those to my kit, I was always misplacing my needles in the middle of a project.
LOL – what is it about keeping our staples in ample supply to avoid that “oh, no, I’m running out” feeling! I’m that way with batting and thread, always need ample options on hand! I equate it to having a well stocked pantry – ha! Also – you have me really curious about the Fiskars foldable scissors – they sounds perfect for travel.
What is your favourite item in your kit? Why?
I just discovered the convenience of carrying a small case of wound bobbins in my kit. It’s perfect for having several different colors of thread handy without the bulk of full spools! It’s nice to always have a close color match handy when I’m on the go!
That’s genius, Michelle! I hadn’t thought of that, but bobbins would be way easier to travel with and keeps the bulk to a minimum. Smart!
What’s one thing we’d be surprised to find in your bag?
A lack of clutter?!? haha! My workspace is always in a state of disarray, but for some reason I find joy in keeping my on-the-go bag sleek and simple with only the things I need.
That’s sound glorious! Streamlined notions in your sewing bag sounds like a breath of fresh air! And must mean that finding items in your kit is a no brainer 😉
When do you find yourself using your kit the most? (Travelling, on the sofa, attending sew-ins?)
Currently, I use my kit most in bed. I try to sew a bit each night while my husband is reading. It’s a good way to make a little sewing progress every day. I’m always surprised how little bits of time add up in getting a project done! I can’t wait to take it to sew-ins with my guild once those are able to start up again.
Can you believe I’ve never stitched in bed! But your routine is giving me ideas! That sounds like such a glorious way to wind down before bed. And you’re so right about little bits of sewing time adding up. I tend to sneak those moments in in the morning before my day gets started and the craziness sets in!
What’s your favourite travel memory with your sewing bag?
Last month, I took my sewing bag camping with me for the first time. It was so fun to be outdoors enjoying sewing in the sunshine. My daughters sat by me and watched me for a while. I’m hoping that one day, they’ll have their own little sewing bags and will want to join me!
Stitching outdoors is the BEST! I haven’t done it while camping, but I do enjoy stitching outside up at lake. It takes an already soothing activity to a heightened Zen level. Total bliss! How fun to look forward to the day your girls join you in the quilty fun 😊
Tell people where we can find you?
I’d love for you to come check out my work and say hi over on Instagram (@michellebartholomew). My website where you can find my quilting patterns is michellebartholomew.com.
Anything else you’d like to share?
Thanks so much for including me! This is always my favorite read. I love seeing what everyone has in their bags!
It’s been such a pleasure reading through your responses, Michelle! Thank you so much for participating and sharing your love for stitching. Your adorable handmade sewing bag and kit are making me want to whip up another set for myself, which to me is proof of the joy we inspire in one another by sharing our quilty projects. Plus, it’s always fun to sneak a peek inside a fellow makers’ bag to see what notions help you in your creative process 😉 MUAH – thank you for sharing!
_________________________________________________________________________
For more What’s in Your Sewing Bag fun, check out these guests:
Happy stitching!
xo,
Shannon
_________________________________________________________________________
PS don’t forget to sign up for the weekly newsletter so you don’t miss out on any future WIYSB guests!
This post uses affiliate links. For more info, visit the FAQ page.
Do you ever stop to consider your quilty footprint?
Sustainability is something that comes to mind frequently around here, especially as it relates to my studio.
If you’ve seen any of my IG stories, then you know being in nature is a huge source of joy and inspiration. Something I want to protect and preserve as much as possible.
As my sewing and quilting grew in frequency, I became more and more aware of the carbon footprint all the fabric, thread, notions, etc. I use and how they contribute to our environmental problem.
Which is why I’m pretty stringent on keeping my scraps and, this is the key, using them!
*This post contains affiliate links, meaning, at no additional cost to you, if you click through and make a purchase, I may receive a commission.
There’s a few reasons for this:
First, I want to maximize my fabric dollars. I’ve already spent money to bring the fabric into my studio and whatever is left after my sewing project is done, I consider to be a bonus. More mileage out of a purchase than I had expected. It’s a fun position to be in 😉
Second, I want to prevent as much of my project trimmings from ending up in a landfill. While 100% cotton and linen (the substrates I typically use) are among the most biodegradable fabrics (decomposing in as little as a week to 5 months), I still want to limit how much ends up needlessly in the garbage.
Third, there’s something to be said about the freedom you feel when working with ‘bonus’ fabric. It’s liberating.
Since I quilt on the regular, I’ve accumulated a lot of scraps. If you quilt, you know exactly what I mean when I say they just seem to multiply!
Thankfully I’m in no hurry of rushing my way through them as quilting is definitely therapeutic for me and, for now, I don’t see myself ever not stitching. But I digress.
My point is that I do my best to figure out ingenious ways to use up remnants from a quilt project.
Environmental concerns aside, there’s just something about scraps that really intrigues me. And one of the best ways I’ve found to use them up in through the art of improv quilting.
Take these mini abstract quilts I made for my dad.
I had some leftover HSTs from the Double Windmill Quilt I made him for his birthday. He was so thrilled with it, that I thought a perfect companion to the quilt would be some wall art featuring those very same fabrics.
I had a few half square triangles leftover and the HSTs kept calling to me, so that’s where I started.
I just took the HST and sliced it where I felt it needed to be sliced.
It felt good cutting into a perfectly good HST just to see where I would end up!
After my slicing session, I designed a layout that eventually resulted in this little pretty.
Don’t you love that pop of yellow?!
It’s probably one of my favourite bits.
The second piece I made him, showcases the HSTs being used in their original form. That was my starting point for this little cutie.
While I made each one unique with a very different starting point, they’re were designed as a pair. They’re totally cute each on their own, but I love how they look together.
One has way more order than the other.
Together they bring out the best in each other.
In case any of the materials caught your eye, here’s what I featured in these modern abstract mini art quilts:
Here are the general rules I gave myself for this project:
From there it was just a matter of tuning into my instincts and seeing where I ended up!
If you’ve never dove into your fabric scrap stash to whip up an improv mini, my question is “whatchya waiting for?!”. This is such a glorious technique to let loose, have fun and use up your scraps. Don’t overthink it, just dive in and see where you end up. That’s all part of the improv fun!
Consider using an orphan block as your starting point. It could be a log cabin block, an HST, a block gone wrong – anything can be a starting point.
Add in a maximum of 3 to 4 solids or prints that would mix well with your orphan block.
Set a target size.
Then just have fun slicing and stitching.
You’ll be amazed at how liberating the process is, all while doing your part to help save the planet 😊
If improv has you intrigued, sign up for the workshop wait list newsletter to be the first to know when the improv workshop launches!
For more inspiration on making your quilty practice more sustainable through the art of improv quilting, check out these improv projects I’ve made featuring just fabric scraps:
How do you bring sustainability into your creative practice?
Happy quilting!
xo,
Shannon
_________________________________________________________________________
Never miss a post - sign up for the weekly newsletter.
This post uses affiliate links. For more info, visit the FAQ page.
Do you love pretty things?
Then you’re in for a treat!
Today’s What’s in Your Sewing Bag guest has a knack for imbuing pretty in everything she creates.
Ali from Arabesque Scissors has been a quilty friend for quite a while. We naturally met on Instagram – shocker, I know 😉
Since I’m based in Canada and Ali lives in Australia, our creative paths probably would have never crossed had we not both been on Instagram.
How lucky are we that technology allows us to create these connections. Until I can hop on a plane and visit Ali in her studio, I’ll have to get my fill of her gorgeous handmade pillows, quilts and sewing notions online. Her adorable needle books are always a feast for the eyes.
Which is why I’m thrilled for you to get a chance to know Ali’s creative journey and sneak a peek inside her sewing bags – yup, that’s bags with an ‘s’ 😊
*This post contains affiliate links, meaning, at no additional cost to you, if you click through and make a purchase, I may receive a commission.
Introduction – tell us a little about yourself! How did you get started on your quilting journey?
I’ve been sewing since I was very small – mum taught me the basics of using her tiny Elna machine when I was about 8 years old. This meant teaching me sewing straight(ish!) lines, and untangling knots when I got in a mess, then she left me too it, watching with greater and greater trepidation as I began sewing more complicated and expensive items!
I made my first quilt for my bed when I was 15, out of offcuts from a Manchester warehouse. You used to be able to buy their precut squares, and you got a lucky dip kind of bag full. They certainly weren’t regular sizes, but that didn’t matter. I made my first patchwork quilt, with no points matching, along with Austrian blinds for my window, and an EPP cushion. Years later I sat on that cushion and found a pin I’d left behind in it!
I dabbled in all kinds of crafts and types of sewing – even running a dressmaking business when I first got married. I used to make wedding dresses, although the thought of that now scares me to death. I’m officially back to the ‘no I won’t hem your pants!’
So now after nearly finishing raising and homeschooling 6 kids, and welcoming our first grandchild, my super busy life revolves around becoming more organised. I need to fit my beloved sewing into my day. I’m designing products that help me towards this goal, and hopefully help others towards this too!
Ouch, Ali! That’s always been a fear of mine – leaving a pin in something and then ‘finding’ it years later – ha! I just adore how you got started sewing. What lovely memories you must have of sewing with your mum when you were young. I think it’s awesome that you took her introduction to sewing and ran with it! How cool that you were a wedding dress maker! That must have been quite the ride, but I totally hear you on the ‘no, I won’t hem your pants!’ – lol!
Wow, Ali, I didn’t know you have 6 kids! I’m always amazed by how much mothers can get done! No wonder you’re all about being more organized 😉
What kind of sewing bag do you have? (e.g. did you make it? Buy it?)
I’ve had many sewing bags, and all of them I’ve made myself. But I’ve found myself frustrated that nothing I’ve made has worked super well for what I’ve intended, or even work together with other bags properly. Especially when I need to pack up and travel, then I’ve had to use an ugly purchased catch-all to pile everything into, which has never been functional either.
So I recently set out to begin seriously designing my own travelling bag system. Something that is not only functional, but easy on the eye as well.
So this is my first prototype of the ‘mix and match’ all in one stitching tote. It doesn’t have an official name as yet, but I totally love it! I’ve tried to think very differently about how I use and store stuff, and what would be the most functional way of creating a bag that isn’t plastic, doesn’t use plastic, but is still sturdy.
This is a lovely and practical design, Ali! I love how everything nests into itself. Plus, your fabric choices are so inspiring and pretty to look at!! I do love me some handmade eye-candy!
What are your all-star essentials? Your tried-and-true must haves that you can never run out of?
So in this bag there’s rather a lot of stuff…but it fits together perfectly and looks pretty spiffy in the latest *Tilda Garden Life collection.
I’m a really big fan of stitching on the sofa as a form of relaxing, even during the day sometimes! I love all kinds of stitching, from English Paper Piecing to hand quilting, needle turn, crochet and knitting. My favourite products right now are from *Sewline – the glue pen, the *chalk pencil and the *eraser. They’re just so well designed and made to last. I may have stashed quite a lot of *glue refills too – I go through them quite quickly and just love that *glue pen!
I also love a sharp pair of tiny scissors; I keep a couple in here actually – I find they’re super useful. I have a bit of a scissors thing going on – I have way more scissors than I will ever need, and some of them even cut! My small rotary cutter is a great travel option too.
Sewline has some really nifty notions. I have their glue pen and chalk pencil and both work like a charm! With all the EPP you do, I don’t blame you for stocking up on the glue refills! Always good to have those at the ready for when the mood strikes 😉 We twin on loving scissors. I’m not sure what it is, but there’s something very appealing about the little snips that just bring joy to my stitching journey!
What is your favourite item in your kit? Why?
My favourite item is probably my *Clover leather thimble. It seems like this a popular favourite in this sewing bag series! It really saves my fingers when I’m having a good stitching session. I can go so much longer when I’m wearing this. I have another brand as well which I also wear, but I’m going to get a second one of these, as they’re just that good.
Aren’t they the best?! I often catch myself walking around the house with mine still on! It’s so cozy I forget I have it on 😉
What’s one thing we’d be surprised to find in your bag?
I have a *Toblerone stashed inside sometimes…being chocolate you can’t keep it too long, which is kind of the point. The size fits perfectly and might be the reason I designed the whole bag! Stitching and chocolate go hand in hand…carefully of course. We don’t want any sticky marks…
LOL – Ali, my eyes 100% darted to the mini Toblerone included in your sewing bag. I have the biggest sweet tooth and Toblerone is a fave around here! I do love that you designed your bag with chocolate goodies in mind!!
When do you find yourself using your kit the most? (Travelling, on the sofa, attending sew-ins?)
I like to take this bag everywhere…from my studio to my sofa, and away with me when I travel too. It’s super sturdy and stable, and all the parts are interchangeable, which means I can just add in more pouches, nix the hexie tray, or load up on Toblerones if the need arises!
So fun to have options! I love how versatile your sewing bag design is. I can see it working for so many different styles of makers.
What’s your favourite travel memory with your sewing bag?
None so far, as my bag is super new!
Just think of the fun memories you’re going to create with her! Love that kind of anticipation 😉
Tell people where we can find you?
This bag is being written up as a pattern as we speak for a proposed release date around August. So to keep up-to-date, just go to Arabesque-Scissors.com and sign up for my newsletter, and I’ll keep you informed. You can also follow me:
Anything else you’d like to share?
Thank you so much for having me here today Shannon – I’ve loved reading your series and seeing how other sewists sew. And it’s been super fun to share a peek inside my bag, and how it’s working for me.
Oh, it’s me who thanks you, Ali! This series wouldn’t be possible without your participation. So, thank you! It’s always a treat getting to read through your responses and seeing the photos that get sent through. Keep up your amazing work and sharing your beautiful creations to inspire us on the daily.
_________________________________________________________________________
For more What’s in Your Sewing Bag fun, check out these guests:
Happy stitching!
xo,
Shannon
_________________________________________________________________________
PS don’t forget to sign up for the weekly newsletter so you don’t miss out on any future WIYSB guests!
This post uses affiliate links. For more info, visit the FAQ page.
New threads in the stu-stu-studio!
That’s making me think of the song Sussudio by Phil Collins – “Just say the word, oh Su-Sussudio”.
Giddy feelings always abound when new quilty notions arrive. Surely, I’m not alone in this feeling 😉
If you’re not excited by spools of fiber prettiness, then you must be buying the wrong kind of thread – ha!
But I get it. I didn’t really give much thought to thread either when I first started quilting.
I mean, thread is thread, right?
But if you’re not getting fired up by your thread options, then you’re missing out.
You can read all about why I love Aurifil Thread, but suffice to say, I found the quilty details I could create with the various thread weights and gorgeous array of colours to be hard to resist! Plus, my tension issues became a thing of the past. The latter was huge for the enjoyment of my quilting practice. Ongoing tension issues are a sure-fire way to kill my sewjo.
Which is why I love being a part of the Aurifil family. This is my third year in a row as an Aurifil Artisan and I still love seeing “from Italy” on the parcel when my delivery guy drops it off. It’s instant happiness and that feeling of opening a fun gift as a kid. Remember that feeling? Giddy would be a good way to describe it 😉
My happy mail arrived, and I wanted to give you a front row view of all the yummy contents.
Let’s dive in!
*This post contains affiliate links, meaning, at no additional cost to you, if you click through and make a purchase, I may receive a commission.
Here’s a no holds barred look at the Aurifil Thread goodies in the 2021 Aurifil Artisan collection. Just a quick note that each Artisan gets their own unique blend of threads sent over. So, seeing mine won’t take away from the fun of peeking inside the other Artisans’ kits 😉
I love that the large spools come packed in an *Aurifil Thread storage box. These are great for storing your large spools. I've also got my cut-up Kona Color cards stored in my 2019 one!
And of course, a new *colour card! These are the best to have on hand. I’ve raved about them since I first discovered them early in my stitching journey and couldn’t live without them. This is a must have!
Which is why I'm so excited to be giving one away!! (more on that below)
Click the below links for or a peek inside my previous Artisan Thread collections:
Since I know you love taking a sneak peek inside makers sewing kits through the What’s in Your Sewing Bag? series, I thought it could be fun to break down what size thread spools I stock and what I use the different sizes for. Hopefully this helps you assess your own thread needs based on your quilty practice.
To kick things off, I thought we’d start with the big guys – the cones!
I never thought I’d end up buying cones. They just seemed so big. Would I ever be able to get through an entire one?
Turns out, I can!
Now, whether you stitch on the daily or stitch with lesser frequency, it doesn’t matter, *Aurifil Thread cones are always a great investment.
I stock cones in both the colour *2000 and *2021. The latter is what I’ve traditionally pieced all my quilts with. It’s called Natural White and, in my quilty books, it’s the perfect shade of white.
But back in 2019, I received a cone of Light Sand as part of my Aurifil Artisan collection and had heard so many quilters say how much they love stitching with a light beige coloured thread, especially as it relates to piecing darker fabrics. The thought is that the beige is a less harsh contrast compared to the white.
I’ve really enjoyed stitching with colour 2000. But I still love using my white too. So, I just use based on whichever is already set-up on my sewing machine 😉
I also stock a couple of shades that I just love quilting with. Namely, Dove in 28wt. I love, love, love this colour. I know many quilters who use this for all their piecing (again, because it’s supposed to blend seamlessly with all colours). I haven’t tried that out, but I have featured her in many quilts.
See quilts stitched with 28wt in Dove:
If I know I’ll use the colour often when I’m stitching, then I’m all for keeping it on hand in cone format. From a cost perspective it’s the wiser move, but I also love the peace of mind having a full stock of my favourite thread on hand gives me. I don’t need to question whether I have the right colour thread to quilt with. I know I do!
This is my main thread size sweet spot. This is also where my quilty journey with Aurifil Threads started, so maybe that’s why I have a soft spot for them 😉
But here’s what I love – the large size means I have quite a bit of quilty peace of mind. There is quite a bit of thread on there and, if memory serves, one spool lasted me forever. I was really surprised. And it encouraged me to stock my quilting thread in this size.
From one large spool I can easily quilt several quilts. I mainly make large lap and throw size quilts and I’ve never used up a whole spool just on one quilt. Normally I eek out several. I love this, because over the years I’ve started to amass a nice collection. My ‘leftover’ thread on large spools have come in handy for ‘shopping my thread stash’ when a new quilty project rolls around. Rather than have to buy a new spool each time, I first check what I already have on hand. If I have a close enough match, I make it work!
As an Aurifil Artisan, I’m lucky to be sent a fun new selection each year, but even before that, I had already started a nice collection.
Thread is such a fun way to add detail and texture and it’s really nice to have them on hand to look at and be inspired by.
You certainly don’t need to stock as much I do, but I do encourage you to pick-up a few spools in different colours to start exploring. A great way to do that is through the *Color Builder series. I had the pleasure of shooting a campaign for them and I am constantly inspired by the colours they come in.
Small spools are not a main staple in my thread stash.
Most of the small spools have been given to me. It’s not a size I typically buy, but then maybe I’m a strange bird who likes knowing I won’t run out of thread – ha!
I see them as practical for colours that you might not like, but are perfect for a specific project you have in mind (and don’t want to be stuck with a bunch leftover). I can also see them being useful for testing out a new thread weight to see if it’s something you want to stock in a larger size going forward. There’s also a case to be made in their favour for being more travel friendly.
I’ve used them to stitch up my Marble Reverberance quilt and they fit the bill perfectly.
But other than the *Aurifloss which solely comes on the wooden small pools, this isn’t my go-to size.
Since an Aurifil Thread Color Card is a MUST in my sewing studio I couldn't think of a better gift to give you than your very own!
To enter the giveaway simply leave a comment below telling me which thread weight and spool size is your fave!
That's it!
Giveaway closes on Monday June 7, 2021 at 11:59 pm EST. I'll pick a winner at random.
Good luck!
For more thread inspiration, check out the following posts:
Size doesn’t normally matter to me, but when it comes to thread spool sizes, my motto is definitely larger is better – ha!
What’s your favourite thread spool sizes to work with and why? It’s always so fun to get to know you and your quilty preferences better 😊
Happy stitching!
xo
Shannon
_________________________________________________________________________
Never miss a post - sign up for the weekly newsletter.
This post uses affiliate links. For more info, visit the FAQ page.
Summer is quickly approaching and that means outdoor fun is about to kick into high drive.
Not sure what the COVID restrictions are for you, but it’s about to open up here in Quebec with outdoor gatherings being permitted – wahooo!!
And what better way to celebrate being reunited with family and friends after….gah, a year now?! – than to celebrate with some brand new homemade table linens.
Rather than just a plain jane table runner, I’m showing you how to kick it up a notch with this joyful Jolly Jelly quilted table runner.
*This post contains affiliate links, meaning, at no additional cost to you, if you click through and make a purchase, I may receive a commission.
This is the 5th collection I’ve worked with of Amy’s and each time she releases a new series I’m always floored by how her designs continue to evolve yet always retain that beautiful whimsy and delicateness I’ve come to know of Amy’s work. One notable difference in the Velvet collection is that I feel it’s got a sophistication and English interior design vibes that really lend themselves to all the home décor projects. Less girly and more feminine if that makes sense.
There’s two colourways to choose from, the warm toned, very pleasing and coral focused *Beloved (no surprise here that I love this colourway) and the cooler more richly hued *Treasured.
I opted to blend the two colourways for a beautiful push pull effect between the warmer and cooler tones. I do love adding a little contrast in my designs and mixing warm and cool tones is a great way to achieve that!
I originally planned on making a Harvest Falls quilted wall hanging, but once the fabric arrived, I couldn’t get the Jolly Jelly quilt out of my head! It just seemed like the perfect pairing to feature Velvet in and celebrate the impending arrival of summer and all the fun outdoor entertaining we’ll get to do! I had visions of hosting high tea with scones and jam all atop my new Jolly Jelly table runner!
My intent was to pair the Velvet prints with a Pure Solids in *Icy Mint, but once I switched my idea to the table runner, I wanted to incorporate a little texture and what better way than with some linen! This one is leftover from my lap Cloud Surfing quilt and my Cloud Surfing Improv wall hanging. I’ve been holding onto these remnants for quite a while just waiting for the right project to come along. This quilted table runner was that project!
While I think the blue would have been a glorious combo, I do love how both the vibrant and more subdued colours of the collection pop against the calm neutral beige background of the AGF Premium Linen.
There was a moment where I thought I wasn’t going to have enough of the background fabric, but this is why I love holding onto all my trimmings, because I used a weird remnant from cutting my oval drunkard’s path block to eek out just enough for Jolly Jelly table runner – love when that happens. It’s a sign to me that it was meant to be 😉
Plus, any time I can sneak in a different substrate that oozes texture I’m alllll in!
You can read more on working with substrates here.
It’s been a while since I tackled a foundation paper piecing session (most likely the last time I made a Jolly Jelly block back in November 😉). I also don’t typically take on multiple FPP blocks at once. There were a few things that I observed along the way:
For the layout I opted to make 4 Jolly Jelly quilt blocks and then arranged them side by side, alternating one pointing up and the other pointing down. This means that no matter where you’re sitting at the table you can see a Jolly Jelly jar 😊
Here’s how each Velvet fabric combo breaks down:
I was short on time. What else is new – ha! So, I opted for 1.5” quilted straight lines. I have this *ruler from my Sunshine on a Saturday Morning mini collab and it was perfect for plotting my stitch lines with a *Hera marker!
I love how the simple lines using 50wt Aurifil Thread doesn’t steal the spotlight from the Jolly Jelly jars, but still gives some texture and that classic quilty puff.
This design is always super speedy and super enjoyable. I really do enjoy the Zen state I get into when machine quilting straight lines. Plus, it means I get to catch up on podcasts – woot woot! For this session I tuned into Marie Forleo’s episode on Healing Trauma with Science and Self-Care with Dr. James Gordon.
This past year has been really strange and taxing on all of us in different ways. There were so many moments in this conversation that I paused and really thought through what he was saying, but the one I kept coming back to is how helpful journaling is. It allows us not only to reconnect with how we’re feeling, but it also allows our emotions to be released. I have a tendency to bottle things up, so I can see this being a very beneficial practice for me. Turns out after only 3 consecutive days of journaling for 20 minutes we’re left less stressed and more in tune with ourselves – how cool is that?! I have a journal by my bed, but I haven’t been using it as I tend to be someone who associates bed with sleeping – ha! I’m going to try journaling in the morning and see if that works better for me.
I’m curious – do you journal?
This binding made more sense with my original quilt idea, but I still love how she turned out. There’s something about the combo of the warm toned *Firefly Awaken print paired with the cooler tones of *Tumble Reverie that I’m quite enchanted by. While the prints blend into one another, I love that it’s the tone differences that really make the statement.
To finish her off, I ended up going with a classic blind stitch for the hand binding. I’ve been on a real big stitch hand binding kick as of late, but this one was calling for something more subtle and seamless. A blind stitch does that beautifully.
For more binding tips, check out the 3-part binding tutorial series:
To make your own Jolly Jelly table runner featuring Velve, here’s all the materials and notions you’ll need to bring her to life:
*Find all my go-to quilting essentials here.
New to FPP? Check out the Ultimate Foundation Paper Piecing Tutorial to rock your Jolly Jelly blocks.
We have so many talented makers in our community, and I love a good showcase for highlighting each of our unique creations. Amy has pulled together an amazing line-up of modern makers for her Velvet Showcase. Be sure to check out the #velvetshowcase hashtag for all the pretty projects being stitched up!
Velvet Showcase Schedule
For more inspiration featuring Amy’s beautiful fabrics, check out:
How would you feature the Jolly Jelly quilt block pattern?
Happy quilting!
xo,
Shannon
PS while I was stitching this up I kept thinking it would be an adorable bed runner for a little girls room or playroom. Just too cute!
_________________________________________________________________________
Never miss a post - sign up for the weekly newsletter.
This post uses affiliate links. For more info, visit the FAQ page.
The Lunar Eclipse quilt is here and ready for instant download!
This modern quilt pattern featuring quarter circles is juuuuust what the quilty doctor ordered to kick start your sewjo!
Curves bring movement, dimension and an organic feel to your quilts that squares, half square triangles and other linear blocks just don’t have.
Whether curves are new to you or you’ve been pedal to the metal pumping out the curvalicious beauties, the Lunar Eclipse quilt pattern is right for you!
Why?
Because she’s beginner friendly, but is jam packed with options to bring your own quilty touch through your fabric choices or the alternate layouts (more on that in a minute!).
*This post contains affiliate links, meaning, at no additional cost to you, if you click through and make a purchase, I may receive a commission.
Bring on the curvy fun!
I know curves can be intimidating for some but trust me when I say there’s nothing to them!
First, they’re super fun and offer lots of movement and detail to your quilts. Plus, knowing how to sew curves opens up a whole new world of quilty possibilities! This is the just the starting point and the Lunar Eclipse quilt pattern will see you rocking those curves in no time!
Here are just a few things my testers had to say about quilting curves:
If quilting curves has you curious then the Lunar Eclipse quilt is a great introduction for you!
There’s lots of quilty goodness packed into the Lunar Eclipse quilt pattern, including:
8 quilt sizes to choose from:
Step by step graphics for visual cues at each step of the piecing journey
Templates are 100% scaled to size so you don’t have to worry about your printer settings.
Video tutorial on how to cut and work with paper templates 😉.
Colouring page to plan your own design.
Block labels to keep your quilt pieces and blocks organized.
8 colourways to give you lots of fabric and colour inspiration.
4 alternate layouts so you can make the pattern more than once and always come out with a new quilt!
Links to tutorials for added help and guidance.
Fabric cutting diagrams to maximize your fabric usage.
Strip piecing makes for quick assembly.
NEW – track your progress! Yes! The quilt journey can be a long process and remembering where you left off can be a challenge! You can now track your progress at each step of the quilt journey, so you know exactly what still needs to be done! Every one of my pattern testers commented on how amazing this new feature is! So simple, yet so genius! And it’s entirely interaction so if you’re viewing the pattern digitally, you can tick the box off and save your file to pick back up where you left off!
If you’ve never pieced drunkard’s path quilt blocks before, you’ll be a quilty rock star at them by the end of making the Lunar Eclipse quilt 😉
Grab the Lunar Eclipse quilt pattern in the shop and dive in!
What’s fun about the Lunar Eclipse design is that she stems from one of the mini quilts I made during my #100daysofsfDminis.
Picture this, we’d just fled the city after the first wave of COVID shutdowns and found ourselves self-isolating up at the lake. The decision to the leave the city was very last minute and was prompted due to the fact that we were having a tough time sourcing food. So, we packed all the food we had in the city, some clothing and hit the road. The car was packed with essentials and that meant there was no room for my sewing machine and gear.
Blergh – turns out food trumps sewing – ha!
While I had some projects that I brought with me for hand quilting, I wasn’t able to create new projects. I turned to designing quilts on the computer so that I’d have lots of inspiration and projects to tackle once I was reunited with my machine.
I was inspired to look back through my 100-days of sfD minis and thought it could be fun to turn some of them into quilt designs. Shattered Star was the first that I released, but Lunar Eclipse was the first that I designed! Funny how the order in which I design them isn’t always the order in which they get released 😉
This one took a minute to come to life as I was on the hunt for the perfect fabrics to really showcase the design of the pattern and the theme I was going for.
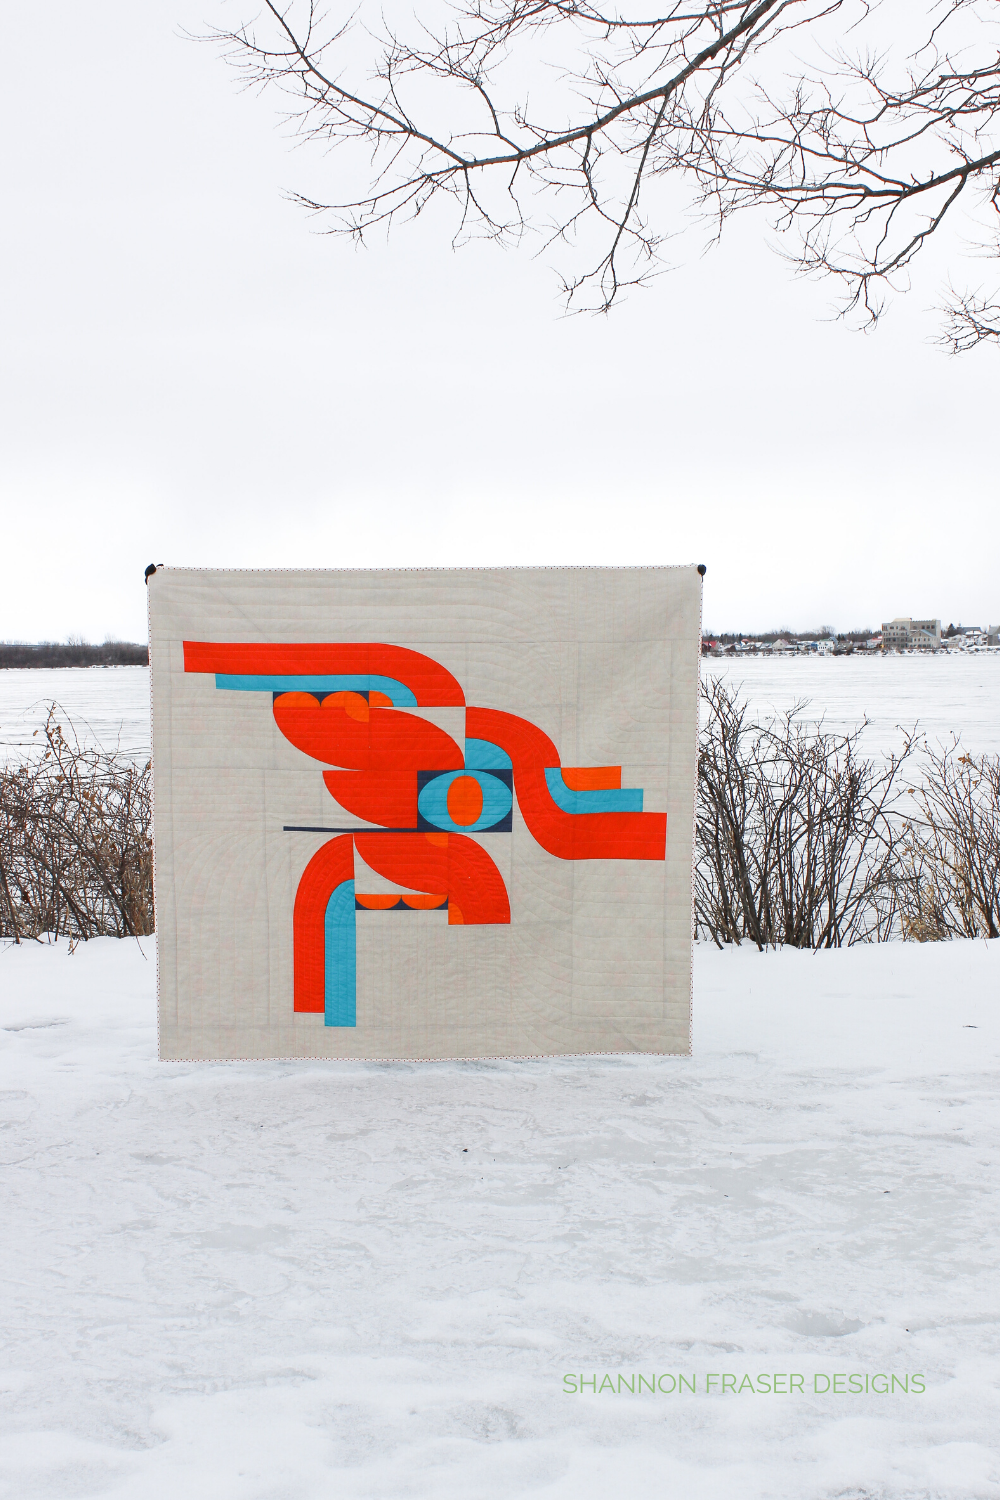
When it came time to selecting fabrics for my Lunar Eclipse quilt, I was on the hunt for something bold, modern, and with an intergalactic feel.
I’d been eyeing Giucy Giuce’s fabric collections for Andover Fabrics and when I saw *Spectratastic II come out I just knew the collection would be perfect for the Lunar Eclipse quilt.
The challenge was narrowing down my colourway from all the fab colours in the collection. I opted to go with primary colours in blue and yellow and then balanced them out with some analogous colours.
One fun element of this pattern is that there’s no official background fabric. That was intentional as I wanted to leave it up to you to decide how you wanted to interpret the background colour. There’s a few options to play with and each will result in a different look with emphasis on different elements in the design.
Here’s a mock-up I did for one of my testers and it shows how just switching Colour 9 for a light colour to a dark one really changes the look of the quilt. This is a great way to build interest in your quilts.
This one’s for you if you love playing with your fabric layouts!
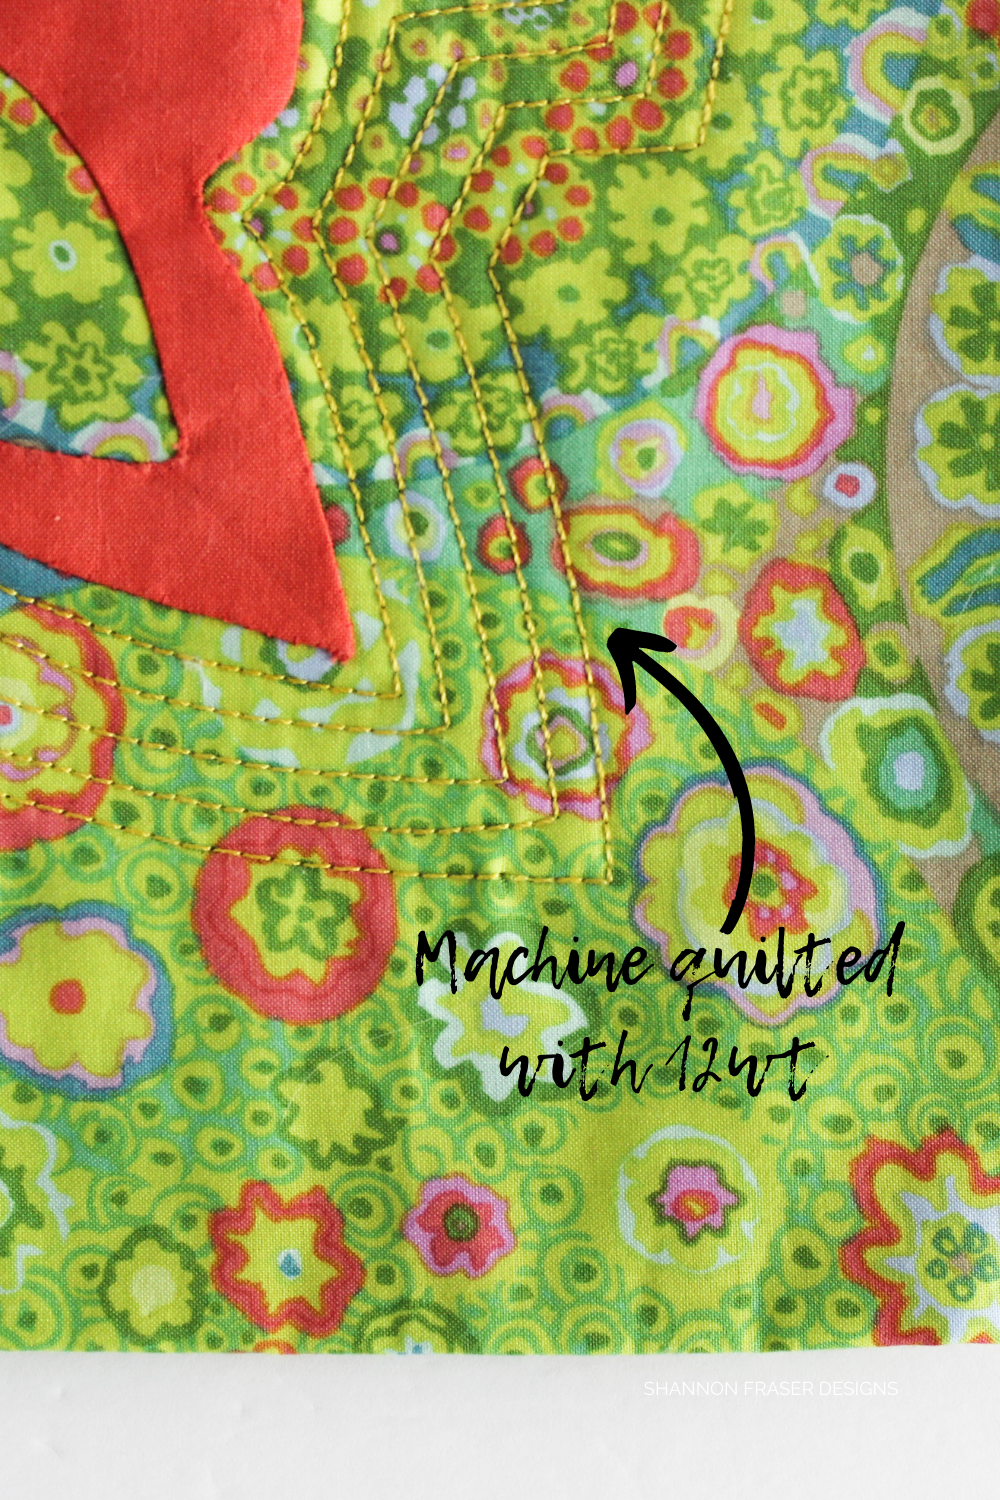
When it came time to quilt her I had originally planned to machine quilt, but when I started quilting the curves with my walking foot, I wasn’t loving the effect.
This was a skills issue! My curves were a little jagged, especially on the smaller curves, so I decided to incorporate some big stitch hand quilting.
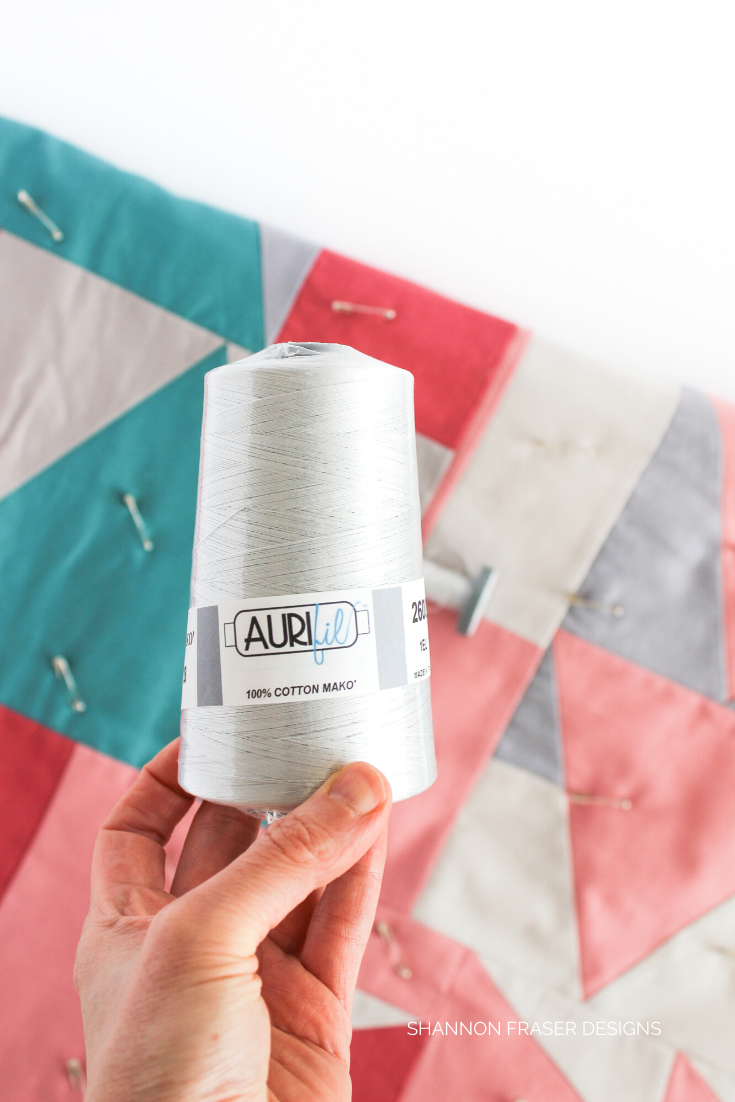
Most of the quilt is machine quilted in 40wt Aurifil Thread in the colour Spring Green. And the smaller curves are hand quilted with pearl cotton thread in size 8 in the colour Cheddar.
I do love how the mix of quilting adds even more texture and detail to the final quilt!
To finish her off, I added a turquoise binding with big stitch hand binding to up the quilty texture even more 😊
Here’s a tutorial on how to big stitch hand bind your quilts!
Here’s everything I used to bring the Lunar Eclipse lap size quilt to life:
Sometimes picking fabrics can be tough, am I right?!
If narrowing down a colourway for your quilts is stress inducing, then the following fabric bundles might just be what you need!
Lisa, from Sew Curated has pulled together two options for you:
Bring the sunshine indoors with the Rise & Shine Lunar Eclipse Quilt Kit Bundle featuring these gorgeous Art Gallery Fabrics PURE Solids in sunny yellows. I can this one being so uplifting when winter rolls around 😉
For a moodier version with calmer vibes grab the Good Night Moon Lunar Eclipse Quilt Kit Bundle featuring these stunning Art Gallery Fabrics PURE Solids and Kona Cotton Solids in shades of blue and gray.
If working with prints is more your quilty jam, then check out Modern Vintage Handmade's beautiful Lap size bundle.
Before releasing patterns to you, they always go through lots of testing, and I couldn’t do that without my fabulous pattern testers! They knocked it wayyyyy out of the park with all the gorgeous versions they stitched up.
If stitching with solids makes you think humdrum, then I challenge you to revisit that concept after seeing Kacie’s gorgeous quilt top. As Kacie from @whoop_ingcrane put it “This is the absolutely fabulous totally Pucci Lunar Eclipse Quilt!” and I couldn’t agree more!
If you’re looking for inspiration featuring fabric prints in your Lunar Eclipse quilt, then this one is uber inspiring! This one has me wanting to pack up a yummy basket full of goodies for a picnic in the fields! Proof that the current maximalist trend works for quilts too!
Alicia from @modernvintagehandmade has pulled together a few kits featuring these prints:
Frieda is one of my longest pattern testers and I’m always so inspired by her fabric selections. She’s been on a purple kick and this purple, gray and pink ombré Lunar Eclipse quilt in Kona Cotton solids is just purplefection! Evidence that following your instincts and what’s calling you to play with leads to fun quilty results!
This bold floral version stitched by Kathleen from @cowdenquiltschool has me wanting to frolic in a field! Can you believe this was Kathleen’s first-time sewing curves – say whaaa?
What is it about blue quilts that just bring instant serenity?! These watery hues Sanne from @sewbysanne featured in her crib quilt are instantly soothing. Lucky little one that gets to run their hands over those yummy hand quilted stitches.
The alternate layouts in the pattern are there to get your creative juices flowing and Kim from @javagoddess89 took that next level with her gorgeous green and purple version. Gotta love a pattern with lots of options 😉
Having a fun modern baby quilt pattern in your repertoire is always super handy! I love this nautical inspired Lunar Eclipse crib quilt made by Gillian from @sewgolly. It gives me all the seaside vibes and has me craving saltwater taffy – ha!
On top of the alternate versions featured in the pattern, there’s lots of other variations you can dream up. Take a cue from Ally from @alsterdeeluxe who opted to go with a modern wall hanging for her place. These soothing shades of watery blues are perfect for bringing the calm indoors. Plus, how can you resist that yummy texture she added in with the big stitch hand quilting. Ally was clever and added taps to both the top and bottom to be able to hang it with the moons up or moons down – loveeeee!
The Lunar Eclipse quilt may look complex, but it’s super easy peasy to quilt her up! Whether this is your first-time piecing curves or you’re a seasoned quilter looking to dive into a fun colour exploration, this modern quilt pattern is for you!!
Grab the Lunar Eclipse quilt pattern, dive into a fun curvy quilt journey and see a whole new world of quilting motifs open up to you!
Happy quilting!
xo,
Shannon
_________________________________________________________________________
Never miss a post - sign up for the weekly newsletter.
This post uses affiliate links. For more info, visit the FAQ page.
This one has been a long time in the making.
5 years to be exact – ha!
Never did I think this one would sit unfinished for so long, but sometimes the quilting journey be that way!
I’m sharing her with you today because:
If you’ve been feeling guilty about a quilt languishing in your closet, then read on for inspiration on revisiting those old beauties.
*This post contains affiliate links, meaning, at no additional cost to you, if you click through and make a purchase, I may receive a commission.
This quilty project started back in 2016 when the Montreal Modern Quilt Guild challenged their members to create a quilted wall hanging inspired by the work of Canadian artist Guido Molinari.
I actually hadn’t heard of his work prior to this challenge, and it was so fun to have one of our members give a presentation on his work.
His artwork is bold, linear, colourful and dynamic. All elements I love in a painting and a quilt!
After studying some of his artwork, I was consistently drawn to the use of triangles in his paintings. There’s something about the angular structure of a triangle that appeals to me. It’s something I’ve doodled in class since early high school!
The quilt design was first and foremost a study in triangles. This was early in my quilting journey, so tackling these larger triangles without a pattern was challenging!
These lines stayed true to the inspiration of Molinari’s work.
A second component of the challenge was to explore the use of colour in my design. Just like Molinari who used a lot of primary and secondary colours in his work to see how the colours change and play off one another, I did the same, but with a richer palette of coral, peach, orange and purple.
Several of these colours I had already played with in my Weight of Love quilt, so it was super interesting to bring in the purple and pomegranate to see how that switched things up.
It was fascinating to see how the colours changed depending on which colour they were placed next to.
When it came time to quilt my One Hundred and Eighty Degree wall hanging, I went all in and decided to quilt triangle motifs that echoed the triangles in the quilt top.
Instead of using just one thread colour, I opted to match the thread colour to the different coloured pieced triangles. I wanted the quilting to blend in and only leave the texture to enhance the design.
I loved it!
Quilting her up was fun (although took quite a bit of time) and seeing the texture that emerged was so encouraging.
To keep the quilting within the respective triangles, meant I needed to bury my threads. This was a first for me at the time.
I remember having to call my quilty friend Josée to help me out! Nothing like having quilty friends on speed dial to save you from quilty struggles!
Once I got the hang of bringing up my bobbin thread, I got into a real groove.
Everything was going smoothly…until I needed to bury allllll those threads.
I was making great progress with my modern quilted wall hanging when the project came to a screeching halt at the thread burying stage.
Blergh.
That step was intense.
And long.
And fiddly.
And a tangled mess (compounded by the fact that I had travelled with her multiple times, had quilts placed on top of her – leading to lots of tangled threads).
It was not an inspiring step, and it totally killed my sew mojo.
But I was tired of seeing her draped over the back of my sofa and, so back in summer of 2020, I finally committed to getting those threads buried.
I’m so glad I did!
Because once I had that monotonous step done, I could move on to adding to the hanging sleeve and get her photographed!
If you’re new to thread burying, I’ve got a full step by step tutorial for you!
Here’s a full round-up of all the materials and notions I used to create the one hundred and eighty degree quilted wall hanging:
Quilting is not the fastest creative outlet, but that’s actually one of the things I love most about quilting! The point is not to whip something up in a day, but to be more methodical and considerate about your making. That’s all fine to say, but with a longer path from concept to creation comes the increased likelihood that your project will take longer than anticipated to finish.
Life has a sneaky way of getting in the way. If we had just one project to focus on, then we could buckle down and just get her done. But that’s not always reality. At least it isn’t for me!
My personal quilty projects often fall to the back burner when the biz size of things needs more of my focus and attention. This isn’t a bad thing, just something I need to work around. What often happens is that I lose my momentum with a project and I need to ‘rediscover’ my sew mojo for said project. With this one, the thread burying really killed that sew mojo.
Thread burying isn’t hard, it’s just tedious and being confronted with 100s of threads to bury (ok, maybe not that many, but it certainly felt that way!) at once was daunting. My biggest tip here, which had been shared with me by another quilty friend, is to bury threads as you go. Simple, right? And totally genius!
I should have listened as she was clearly speaking from experience and trying to save me from that feeling of overwhelm. I didn’t listen and learned the hard way. So, take it from me – bury your threads as you go!
Having her sit there for so long as a quilt in the works, forced me to confront how I feel about having WIPs kicking around the sewing studio. Initially, I felt a little guilty. I bought all this fabric and pieced her up and now she’s just sitting there half finished.
That didn’t make me feel great and, honestly, there were many times I had no time to work on her even if I’d wanted to.
To keep my sanity, I opted to change my internal dialogue to “I love that quilt and I can’t wait to get back to her. For now, she needs to be patient until I can properly focus my attention on her.”
Yes, I do talk to myself and my quilts on the regular!
But whether you say it out loud or think it, the important thing I discovered is that we’re in charge of how we approach our quilting practice. You can choose whether you want to feel guilty about unfinished quilts or choose to change the message for a more positive outlook.
You know my tendency to look at life with a glass half full attitude and I bring that approach into my quilting practice too.
In the end, I managed to get her finished and hung up just in time for my first ever video collaboration! Hanging her up and seeing her featured in the sewing room tour brought me so much joy!
So, just because a quilt may have sat unfinished for awhile (even years) doesn’t mean that you’ll enjoy the finish any less when she’s done. If anything, I’d say there’s a little extra love for seeing a challenging project through to completion.
For more quilted wall hanging inspiration check out:
I’d love to know what your longest WIP was and how you felt after getting her done! Share in the comments below.
Happy stitching!
xo
Shannon
_________________________________________________________________________
Never miss a post - sign up for the weekly newsletter.
This post uses affiliate links. For more info, visit the FAQ page.
Do you remember the first creative that got you fired up to make?
You know the one. The one that every time they share a new project or make you just fan girl over it?!
That’s how I’ve always felt about Amy Sinibaldi’s work. There's something about her whimsical designs that I just adore.
It’s been such a pleasure to see her creative journey evolve from sharing handmade goodies on her blog nanaCompany and in her Etsy shop, to writing books and launching countless gorgeous fabric collections with Art Gallery Fabrics. Which you may have noticed sneak their way into my quilty projects on the regular (see them here, here, here and here) 😉
When I thought about the What’s in Your Sewing Bag series, I just knew that Amy would bring her magical touch and offer you lots of inspiration.
Let’s dive in!
*This post contains affiliate links, meaning, at no additional cost to you, if you click through and make a purchase, I may receive a commission.
Introduction – tell us a little about yourself! How did you get started on your quilting journey?
I began sewing in 2006 after convincing my husband to buy me a sewing machine on Father’s Day, no less. That says a lot about my husband, by the way. He’s my biggest cheerleader and believes I can do anything! At any rate, we bought a Shark sewing machine from Target and I struggled on that thing for years. Then I thought I was moving up in the world when I bought a Singer, but that was still awful. When I bought myself a Janome 7700–that was the first time I realized that sewing doesn’t have to be a struggle or arm-wrestling match. It sews like a dream and I love it.
So, the first thing I taught myself to sew were little girls’ aprons. I made these felt sugar cookies with bead sprinkles and it was all so cute. Then little by little I taught myself to sew just about anything. I simply went through all the techniques and sewing projects, one by one, and taught myself via the internet. At the time I was sharing all my work on Flickr and getting feedback from that community, which I loved. I caught the eye of some amazing people in the biz who asked me to start contributing to books and magazines. Eventually Tuva publishing asked me to write a book for them—the first in their sewing sector as they’d previously only published cross-stitch and embroidery books. At about the same time I was approached by Pat at Art Gallery Fabrics, and that was a dream come true! I designed my first collection, Paperie, under Pat’s tutelage and I am about to complete my tenth collection with Art Gallery Fabrics. It’s been a very public, very long journey of learning and growing creatively, and I’m still learning. I’m still working really hard at making my ideal fabric collection, but I get closer with each collection I design.
I love how your sewing journey started, Amy! It’s very similar to my own 😊 I remember you sharing a picture of your sewing room in your garage and being so inspired that you don’t need to have a fancy sewing room to be creative! I’m so thankful to Pat for reaching out to have you design fabric – you’re so meant to have your designs on fabric!!
What kind of sewing bag do you have? (e.g. did you make it? Buy it?)
I have so many project bags or pouches. They’re all handmade (either by me or my friends) and I have a needle book in each bag along with my fabrics, papers and essentials for that project.
The needle book you made me many moons ago still brings me joy on the daily! Handmade goodies from creative friends really are the best!
What are your all-star essentials? Your tried-and-true must haves that you can never run out of?
I have quite a few “essentials” and I grab as needed, generally as I’m running out the door, but luckily everything is generally ready to go when I am. In each bag I have a needle book, which was one of the first tutorials I published at nanaCompany (my blog) and I have made hundreds of them. The little felt pages are just perfect for holding needles and pins. Then, I like to have a glue stick, my favorite *Clover glass head pins, a *Clover Hera marker, *Clover seam ripper, my fave *Gingher Epaulettes 3.5” embroidery scissors, needles by *Tulip or *Jeana Kimball’s Foxglove Cottage needles, floss by DMC, EPP papers, *leather thimble pads from Colonial, my *Fiskars rotating cutting mat (it’s like 8” x 8”), a mini Fiskars rotary cutter, a *Pilot Frixion pen, my AGF measuring tape, and thread by *Aurifil. Probably the most recent addition to my sewing must haves is a bottle of *Flatter by Soak. I’m madly and deeply in love with the scents and I love the Fig and Pineapple Grove scents best. I feel like these elevate my sewing experience.
OMG, we twin on the Flatter scents!! They really are amazing! I was totally curious about the leather thimble pads from Colonial you mention, Googled it and realized I have a similar product by them, but the plastic version. I bet the leather works way better!
What is your favourite item in your kit? Why?
I suppose my must haves are the *Gingher Epaulettes, a good needle, and *Clover glass head pins. They’re just necessary, quality, sharp and efficient.
I love that your favourite items are the key essentials one needs to tackle any sewing or quilting project! I’ve seen the Epaulette scissors before, but this is the first time a maker has mentioned how awesome they are. You’ve got me curious 😉
What’s one thing we’d be surprised to find in your bag?
I tend to find that what works best for me is to put my most essential items in a cleaned out Bonne Maman jam jar. I can fit a needle book, spool of thread, my scissors, pins, and leather thimble pads in there. Then I can toss it in my bag, as I head out the door.
Clever!! Those Bonne Maman jars are the best for pretty and practical storage. I use them for my basting pins and binder clips (which is what I use for binding), but I hadn’t thought of tossing it in my sewing bag! So clever 😊
When do you find yourself using your kit the most? (Travelling, on the sofa, attending sew-ins?)
Lately the only hand sewing I tend to do is binding. But I love to hand sew binding. I usually do this parked on a couch and watching a movie I’ve seen a hundred times. I may do EPP every once in a while but sewing binding by hand is my fave.
I couldn’t agree more, Amy! Hand binding is my fave too. There’s something so special about finishing the quilt journey with a quiet and cozy binding session while re-watching a movie – quilty bliss!
What’s your favourite travel memory with your sewing bag?
We have taken so many road trips as a family, and I have always taken hand sewing with me on these trips. I have a pouch for each kind of EPP paper I use and I’ll throw in my Bonne Maman jar, and a whole bunch of scraps into a bag and I’m ready to go!
Sounds like you’ve got sewing on the go down pat!
Pictured above is Amy's Well Traveled Sewing Book available in her Etsy Shop.
Tell people where we can find you?
My books:
*Sweetly Stitched Handmades
*Rainy Day Sewing (with Kristyne Czepuryk)
My fabrics:
Anything else you’d like to share?
Don’t let perfection get in the way of anything. As I’ve learned over time, perfection is boring; it defeats the creation of true art and is not really attainable anyway. Enjoy the process and if you don’t know how to do anything don’t let that stop you! Thank goodness for the internet and YouTube. If not knowing how to do something were a true obstacle, I would not be where I am today.
Yes! Love this, Amy! All so true! I love to say don’t let fear get in your way as the best things are just on the other side of your comfort zone.
Thank you for always being such an inspiration and for cheering us on to continue our own creative exploration. I can’t wait to see your 10th fabric collection – I just know it will be stunning!
_________________________________________________________________________
For more What’s in Your Sewing Bag fun, check out these guests:
Happy stitching!
xo,
Shannon
_________________________________________________________________________
PS don’t forget to sign up for the weekly newsletter so you don’t miss out on any future WIYSB guests!
This post uses affiliate links. For more info, visit the FAQ page.
Have you ever tried a quilting technique and thought “this is the pits” and forever banned it from your quilty repertoire?
I’ve been there!
For me, that technique is needle turn appliqué.
I’ve tried it several times and, while I love the ultimate results, the actual act of needle turn appliqué just wasn’t bringing me joy.
It felt fiddly.
It was slow going.
Considering all the time I invested in the preparation, my results were not always that fabulous.
All valid reasons why the technique wasn’t my fave.
Read on to find out what changed my mind and why a simple thing like thread basting was a game changer.
*This post contains affiliate links, meaning, at no additional cost to you, if you click through and make a purchase, I may receive a commission.
When I first gave needle turn appliqué a go, I simply pin basted and used my needle to turn the fabric under as I went.
Seems straightforward enough, right?
Turns out though that approach leads to less than stellar results, at least for me.
Plus, I found this technique very fiddly. Not to mention, I used to prick myself with the pins allll the time.
Blergh.
Which is why I’ve kinda shied away from needle turn appliqué. You might remember my Bohemian Garden quilt that I absolutely adore but is currently sitting in my work in progress pile because I’m just over needle turning.
Skip ahead a couple of years to just a few weeks ago when I caught *Carolyn Friedlander’s needle turn appliqué class on Creativebug.
Why I decided to watch a needle turn appliqué video is beyond me, especially since I’d pretty much given up on it and assumed the technique just wasn’t for me.
But here’s the thing. I feel like needle turn appliqué should be my thing – ha! I love hand quilting and I see so much potential with this technique. It’s just, up to this point, I haven’t enjoyed the process. As you know, I’m big on enjoying the quilty journey.
I’m not going to lie; it didn’t take long before I was fascinated by Carolyn’s approach.
I won’t give it all away, but one of the tips she shared was to first pin baste, then thread baste and then tackle the needle turn applique. Mind blown!
Seeing her work with this technique had me excited – yes, excited – to give needle turn applique another go.
So, when I received this stack of pretty Kaffe Fassett fabrics from Free Spririt Fabrics for the April Aurifil Artisan Challenge, I thought it was the perfect time to revisit this classic technique.
I thought I’d sum up for you the top 5 reasons why I loved this new approach to needle turn appliqué in case you’re curious about trying it out too!
While it was fiddly to measure and add in the hand basting stitches, once I had them done it felt so secure.
Plus, there were no pins in the way pricking me as I was doing the actual needle turn appliqué! Wahoo! This was such a pro of thread basting first.
As with most stitching it was very soothing to sit and tack down my appliqué motif.
I loved seeing the colourful basting stitches – ha! This is such a minor detail that has zero impact on the actual result of your project, but I did love seeing those bright green stitches against the coral. Made me smile, which is always a win in my quilty book!
The results were wayyyyy better. You’ll have to watch the video to really see this technique in action, but my points are pointier and my curves are less jagged compared to the original technique I used.
The pre-preparation was really key in making this technique come together and make it more enjoyable and travel friendly. Plus, the results are in the finish!
When I shared this photo on Instagram I had some lovely quilty friends refer me to some additional blog posts for more needle turn appliqué options:
First up is Gillian of @sewgolly mentioned she found the back basting appliqué technique to be a game changer for her. You can read more about this technique here.
Cheryl from @cheryl_akison also commented that she found Carolyn’s thread basting technique to be a game changer for her too! She wrote a full blog post with 13 reasons why to hand baste with needle turn appliqué.
When I fist started this project I had visions of machine quilting with 28wt, not really surprising given my love for that thread weight. But as I was pulling my box of 12wt Aurifil Thread out, I noticed this glorious gold yellow coloured thread I had on hand and was inspired to finally give machine quilting with 12wt a go!
With a bobbin already prewound with *28wt in leaf green from my Shattered Star Table Runner, I loaded the 12wt in gold yellow on the top and did a test run.
I was amazed that she worked like a charm!
So, I dove right in and started adding echo quilting around the needle turn applliqué design.
The prominent stitch the 12wt gives is just so scrummalicious! But I did run into a couple of problems, including:
Getting my bobbin thread to the top of my project was a little tricky. I have a feeling it was due to the thickness of the thread that it would sometimes get caught just under my needle plate.
I also noticed I had better results (i.e. less catching/ tugging/ breaking) when I had my presser foot down when bringing my bobbin thread up to the front. Not an issue I normally have with burying threads, which is why I’m chalking it up to the thread weight being the issue. If burying threads is new to you, check out this tutorial.
The other problem I ran into was my thread breaking while I was stitching. This happened about 3 times and I’m not really clear why it happened to break when it did. There was no snagging or weird movement that I was doing at the machine when the breakage occurred, so I think I’ll need to experiment a little more to see what leads to the breakage.
There are a couple of places where I had birds nest appear on the back of my quilt. Again, I’m not sure what happened that it created those in only a few areas and the rest looks perfect.
Those minor hiccups were wellll worth the added texture this technique adds. If you’re on the hunt for a technique that gives you oodles of quilty texture without all that time invested in hand quilting, this could be your quilty ticket!
It’s definitely quick to do and I suspect that with more practice the issues I ran into will become less frequent.
I’d love to know, have you given machine quilting with 12wt Aurifil Thread a go?
When it came time to bind her up I decided on a whim to simply turn the front back and create a similar effect to faced binding, but without all the extra work!
This was my first try at folding the front to the back and it worked like a charm! I even figured it out at 5:30 in the morning earlier this week, so definitely an easy peasy technique!
To tack her down, I opted for my current fav big stitch hand quilted binding using 12wt.
If you want to tackle a similar project, here’s everything I used to create this modern quilted wall hanging:
Overall, I still find needle turn appliqué fiddly! When I mentioned this on Instagram, so many of you have the same reaction to this technique. The hardest part for me to get right is the inner corners, but I’m hoping with more practice I’ll get there.
For more inspiration on exploring thread weights, check out:
As with most things in quilting, there’s lots of ways to accomplish the same end result. I’d love to know what your go-to technique is for needle turn appliqué. Share in the comments below.
Happy quilting!
xo,
Shannon
_________________________________________________________________________
Never miss a post - sign up for the weekly newsletter.
This post uses affiliate links. For more info, visit the FAQ page.
Don’t you love it when you have all the materials you need already on hand for a quilty project?
Me toooooooo!
It means you can go from idea to actually making in no time flat – love that!
It’s even better when those fibers happen to be scraps!
You know I have a thing for scraps. What can I say, I want to use every last inch of the fabric I bring in.
First, fabric’s not cheap!
Second, I’m concerned about our landfills and am trying to do my part to limit my contribution to that ever-growing mass.
But what I really love is seeing what can be created from leftovers from other projects.
*This post contains affiliate links, meaning, at no additional cost to you, if you click through and make a purchase, I may receive a commission.
This was the very process and experience I had when pulling my fabrics to test Suzy’s Reflections Wall Hanging quilt pattern.
I stood in front of my fabric cabinet mulling my options and landed on some grey linen trimmings that were calling to me. Although I normally love going bold and colourful, for some reason, this design had me wanting to feature low volume prints that focused more on texture and an overall zen vibe.
The rest of the fabric, namely the white denim and white backing, were gifted to me by a stranger! Yup, this goes way back to when I used to do craft shows when I was selling my bags, pillows and aprons. On day 1 of a 3-day show, a woman popped in randomly and happened to stop by my table. We got to chatting and she told me she used to stitch up a storm, but that as of late she wasn’t really sewing. But she had a ton of fabrics and books that she didn’t know what to do with and wondered if I would take them off her hands. I offered to help out and the next day she showed up with 2 large garbage bags fiiiilled with fabrics, scraps, patterns and books. Honestly, I was a little overwhelmed!
Once I got them all home and laundered, I really wasn’t sure what I was going to do with all this stuff. So, I just lovingly folded it all and added it to my stash. Slowly but surely, I’ve been making a dent in what I received, and I’m thrilled to see these fibers being re-invented and not going to waste.
Once I had my fabrics chosen, I dove in!
The good news is, the Reflections quilt is such a fun and quick pattern by Suzy Quilts. Honestly, I had picked my fabrics, cut them and pieced them all in an afternoon. She’s that quick to make. So, if you’re on the hunt for a fast project this is a good one for you!
When it came time to quilt her, I would have loved to add some hand stitching, but with so much denim in there I was concerned it would be tough on my hands. Turns out that was a smart call, as she was tough enough to baste! Oh, the joys of dealing with tendinitis. But you gotta work around your limitations! In the end, I’m kinda happy I couldn’t hand quilt her, as the machine quilting I opted for is a completely different look than how I would have hand stitched her – and I LOVE the results! It took me just a nano second to opt for *white 50wt Aurifil Thread as I didn’t want the stitching to detract from the low-key vibe of the muted colour palette.
Since most of the fabrics I used are from my stash and have been there for awhile it’s tough to find exact matches for you. But where possible, I’ve listed possible substitutes in case you want to make your own zen Reflections wall hanging!
Despite having laundered my fabrics when I was first gifted them, I didn’t notice that some of the fabrics had some minor staining. This problem was compounded by the fact that I created by backing and got my basting done at nighttime. This meant that I missed seeing a very subtle yellow stain on the white waffle fabric I used for the backing. Blergh.
I would have switched it up had I not already got the pin basting done and had started the machine quilting before noticing the stain. Double blergh.
Thankfully it’s on the back and this is meant as a wall hanging, so no one’s going to see the stain. I mention it so that you learn from my silly mistake and make sure to check all your upcycled fabric in daylight to make sure no stains are marking your textiles. This simple extra step would have saved me lots of frustration. Live and learn 😉
For more inspiration using fabric scraps, check out:
Plus Infinity Quilt - the scrappy one
Cloud Surfing Improv Wall Hanging
The “F” Quilt
House of Cards Quilt
Improv Landmark quilted wall hanging
Hopefully this project encourages you to hang onto your scraps and breathe new life into them!
Happy quilting!
xo,
Shannon
_________________________________________________________________________
Never miss a post - sign up for the weekly newsletter.
This post uses affiliate links. For more info, visit the FAQ page.
On the hunt for quality 100% Egyptian cotton thread?
I’ve got you covered!
One of the top questions I get asked is where to find Aurifil Thread.
I so feel your pain because it took me awhile to find them too. When I first started quilting, I didn’t have a clue about thread. I thought thread was thread. Turns out thread not only makes a difference in the quality of your stitch work, but it can also be a feature of your sewing and quilting projects.
*This post contains affiliate links, meaning, at no additional cost to you, if you click through and make a purchase, I may receive a commission.
Once I understood the importance of thread, I was on the hunt to find the best. Only thing was, most of the big box stores didn’t sell Aurifil Thread.
What was a quilter to do?!
This is where joining my local Montreal Modern Quilt Guild came in handy. It allowed me to connect with like minded creatives and it’s also where I met Stacy, the co-owner of Craft de Ville. Stacy was the first shop that I found that carried Aurifil Thread and she’s still my main go-to. Plus, I just love how she lists the products in her shop, but more on that in a minute.
To save you time on hunting down the stringy stuff, I’ve pulled together a list of shops for you to peruse. The list is a combination of my own personal shopping experience combined with recommendations you shared with me on Instagram.
Since we’re a global community, I’ve decided to break down the list by region in the hopes that you’ll be able to support a local shop and reduce your shipping carbon footprint.
Every little bit to help mother nature 😊
One of the tough things about sourcing Aurifil is finding all the thread weights they offer. Also, you specifically asked me about who carries cones!
To help you out on this front, I’ve created a cheat sheet on the following 45+ quilt stores, fabric shops and online retailers and identified what size thread spools they carry as well as the thread weights they offer.
A quick heads up that this is not an exhaustive list but gives you a good overview of what your thread shopping options are. Also, things are ever evolving in online shopping, so this information is accurate as March 9, 2021.
Sign up here to download the Aurifil Thread Shopping Cheat Sheet.
Cleaners Supply Ashley from @thequiltblondefox was super sweet to respond to my Instagram story inquiry and shared her #1 go to place for Aurifil Thread in 50wt. They have an awesome selection of colours, but only 1 thread weight and only in large spools.
Club Tissus Club Tissus recently added Aurifil Thread to their stores and online shops! They’re carrying almost the full gamut of thread weights and spools. The only thing I didn’t see were cones.
Craft de Ville Stacy’s shop is where I purchased my first spool of Aurifil Thread. I love that her shop is setup similarly to the Aurifil color cards making it super easy to order the exact colour and thread weight you need. Love that!
La Boite a Quilt This is a relatively new shop here in Quebec and I suspect they’ll be adding more goodies as they grow.
Sew Curated My quilty friend Lisa just recently opened her shop and is already stocking Aurifil Thread. Her selection already includes 12wt, 40wt and 50wt. Plus I noticed she’s got some cones too!
Sew Karenly Created Several of my out East quilty friends recommended this shop and they all mentioned her amazing customer service. Love that!
Wawak Canada This one was recommended several times by both US and Canadian friends. They have a US and CDN site, so you get to shop in your preferred currency. Plus, their pricing is pretty hard to beat. But you’re limited to 50wt in large spools.
Depending on where you’re located, the following international friendly options might be your best bet.
Barn Yarns I found this one while doing some research and loved that you could purchase by thread weight and spool size. That makes me happy!
Sew Hot – This one came highly recommended by Claire (Made Just Sew) who mentioned this place “has a really good range and super fast delivery” which, let’s face it, we all want 😉
Crimson Tate - My quilty friend Giucy Giuce recommended Crimson Tate for Aurifil goodies. If you’re on the hunt for Aurifloss, 40wt or 50wt, I’d check ‘em out!
*Fat Quarter Shop - When my US friends ask me where to find Aurifil Thread, I normally point them to the Fat Quarter Shop because their selection is pretty awesomesauce. They pretty much carry all thread weights and all spool sizes, including cones! But they don’t have all the colours, so it can be hit of miss on that front.
Hawthorne Threads - I’m not sure when Hawthorne Threads brought Aurifil into their stores, but they have an excellent selection to meet your quilty needs.
Missouri Star Quilt Co. - This shop is on my wish list to visit! And I’m happy to report they carry a selection of Aurifil Thread, mainly small and large spools in 12wt, 28wt, 40wt and 50wt.
Nest/ Feed Mill Fabric & Quilting
Pumpkin Vine Corner - I found this one while doing some research and wowzers, they’ve got a great selection.
Wawak USA - This one was recommended several times by both US and Canadian friends. They have a US and CDN site, so you get to shop in your preferred currency. Plus, they’re pricing is pretty hard to beat. But you’re limited to 50wt in large spools.
I hope this helps you find the right thread for your quilt projects. I also encourage you to pick up a *color card to make ordering online and planning your projects a breeze! And if you’re not seeing your favourite place to score Aurifil Thread, please share in the comments below!
Don’t forget to download your cheat sheet here!
Happy stitching!
xo
Shannon
_________________________________________________________________________
Never miss a post - sign up for the weekly newsletter.
This post uses affiliate links. For more info, visit the FAQ page.
It’s time for another What’s in Your Sewing Bag?
Today we’re heading down under to visit my very hilarious and super talented quilty friend Xanthe from Wife-Made. If you’re on the hunt for inspiring quilty projects with a side of chuckles, then you should definitely checkout Xanthe’s Instagram feed. I’m quite partial to her butterfly wings pattern which just makes me smile every time a new pair is shared.
I’m excited for you to get to know Xanthe a little better and sneak a peek inside her sewing kit!
*This post contains affiliate links, meaning, at no additional cost to you, if you click through and make a purchase, I may receive a commission.
Introduction – tell us a little about yourself! How did you get started on your quilting journey?
I’ve always been creative, and I’ve been sewing in general since I was young. I used to make clothes for myself and friends as a young teen, and my Mum fostered a love of handwork by taking me to smocking lessons and buying subscriptions to embroidery magazines. I didn’t dive into quilting until I was in my early 20s, despite the fact that I distinctly remember my Mum doing things like foundation paper piecing as a child. And when I say dive, I mean that in the truest sense! The first quilt I made was for a friend. It was a beautiful, traditional patchwork quilt pattern out of a Better Homes & Gardens magazine. It had so many different blocks including tiny flying geese and pinwheels. And I cut all the pieces out with scissors and a regular school ruler!!! (I didn’t know what a rotary cutter or quilting ruler was back then! Haha!) I’ve never really been someone to start small, much to my own detriment in many cases! Needless to say, although the quilt was supposed to be a wedding quilt, it ended up being for their second baby because I seriously underestimated the amount of time a quilt can take to make and the reality of study life and working to support myself through university. As I said, I am very good at biting off more than I can chew.
Ha! I can so relate to diving in and figuring it out as you go, Xanthe! While I know it can sometimes lead to delays in finishing our projects due to underestimating just how much time said project would take, but I love diving in! Too often we can think and think and think about a project, only to think our way out of doing it. What’s important is that you still saw the project through, even if it was a little late 😉 Better late than never! Also, I love that your Mum had already been exposing you to nifty techniques like FPP when you were young. I bet you do the same for your kids today!
What kind of sewing bag do you have? (e.g. did you make it? Buy it?)
Can you believe that I don’t even own a real sewing bag??? (I’m having serious imposter syndrome right now, oh my goodness, am I even a real quilter? Hahaha!) Seriously though, life with four young children has meant that I haven’t really had time to quilt on the run. I have only just come through the really tough season of little ones (my youngest is turning 4 this year) and my hands have had to focus on wiping grotty hands and faces and making sure kids don’t abscond! I’ve been racking my brain trying to think of what I’ve used in those rare times where I have been able to take something to work on, and to be honest and although I don’t really want to admit this, I think I actually put everything in one of those terrible, not-environmentally-friendly-at-all clip-seal bags… #soprofesh These days though, I would definitely put everything in a re-usable clip-seal bag because there is such a thing now and I actually own some ;)
I imagine though, if I DID have a sewing bag (future-Xanthe, take note…) it would most likely be something by Arounna Khounnoraj of Bookhou because I adore and constantly covet her beautiful creations. Or I might even make one for myself using Anna of Noodle-head’s amazing patterns!
I always love your honesty, Xanthe!! And you’re still 100% a professional with your ziplock baggie of goodies 😉 It makes me think of the shoemaker syndrome! It just goes to show you that you don’t need to have a fancy sewing kit to make beautiful things. But I totally agree, when you do have time to make a little pouch for yourself, you can’t go wrong with one of Arounna or Anna’s stellar patterns!
What are your all-star essentials? Your tried-and-true must haves that you can never run out of?
I’m a bit of a minimalist now, when it comes to 'things'. I learned the hard way that you don’t actually need much to be creative. I’ve wasted a lot of money in the past buying all the latest gadgets, thinking I needed 'all the things' to do quilting 'properly', but I’ve found that they actually end up impeding my creativity, rather than improving it. So I tend to stick to the necessary basics: a good pair of fabric scissors, a small and a large rotary cutter with spare blades, a washable fabric pen or pencil, a leather thimble, a sharp pair of snips, sashiko needles and usually some perle thread that I’ve found in an op shop.
Yes, to a minimalist kit! I’m so with you on keeping my essentials to a minimum. It means I have to stock and store less stuff and I’ve found the basics are really all that I need. It feels good not lugging a bunch of ‘things’ around.
What is your favourite item in your kit? Why?
I haven’t really had a favourite item in my kit until recently when I purchased a pair of *Fiskars Ultra-Sharp Thread Snips . These bad boys have transformed my quilting life! I used to get so frustrated about those little metal snips you get for a couple of dollars because they would get blunt really quickly. I admit, I was a little scared about spending $28 on a pair of snips, but I can say that they are worth the investment. Not only do they live up to their name (yep, they are ULTRA-SHARP!) but they are super comfortable and easy to use, and the built-in cover for the blade means they can be safely stored in my bag (and not put holes in it, where cheap plastic clip-seal bags are concerned). Have I convinced you to buy them yet? (And no, Fiskars is not paying me to promote their product, although they probably should be 😉
Oh, dang, those do look like bad boys!! I have a pair of *Fiskars that I picked up for pruning plants and they are sharp!! I also like the spring on them, so they put less stress on my hands (hello, tendinitis). I’ve also found the small cheap metal scissors to dull really quickly. Now I just need to find myself a good scissor sharpener!
What’s one thing we’d be surprised to find in your bag?
If you don’t follow me you might be surprised to find that I will most likely forget to pack something really important to whatever it is I’m working on at the time. You know, something like needles, or thread, or the WIP I’m supposed to be working on. But anyone who’s been following me for a while will know that’s par for the course. Haha! Apart from that, having four kids and working with fabric has taught me it is wise to always have wet wipes on hand. Not only are they useful for cleaning up messes and grubby hands, but they are pretty useful for removing unwanted spots on projects, like fresh blood spots from when you prick yourself with a needle!
Really?! I hadn’t tried wet wipes for spot treating blood! Genius! I’ve always relied on my spit (ew, gross) or peroxide if the spot’s being stubborn. I’m going to have to try these out!
When do you find yourself using your kit the most? (Travelling, on the sofa, attending sew-ins?)
Holidays! If I’m going away, I will most definitely pack something to do on a couch in an AirBnB by the beach while the kids are watching TV or having device time. In this case it’s usually a project that requires little concentration, travels easily and isn’t work-related, like English paper pieced hexies from scraps of fabric.
EPP is such a great travel project! And super relaxing too. Plus, with little ones running around, it’s easy to put down and pick back up without losing track of where you were! Mine are stored in the all profresh ziplock baggie within my sewing kit 😉
What’s your favourite travel memory with your sewing bag?
I remember spending 90% of a holiday back home at my Mum’s sitting at the kitchen table hand-sewing hexies. It is highly likely that I was heavily pregnant at the time and severely sleep-deprived as I don’t remember what the kids did the entire time or anything else about that time away. I just remember zoning out and other adults being cross with me because I hardly moved from the table the whole time. Haha!
Sometimes you just need to sit and stitch! Plus, I’d say it’s pregnant woman’s prerogative to sit and stitch away 90% of the holiday break.
Tell people where we can find you?
If you would like to follow my creative journey you can follow me on Instagram @wifemade or sign up to receive my email newsletter at www.wife-made.com. I also like to save things to my Pinterest boards which you can follow at www.pinterest.com.au/Wifemade.
Oh, I didn’t know you had a Pinterest account – totally following you now! And I love your newsletter – always a fun read 😊
Anything else you’d like to share?
It’s so easy to believe that you need all the bells and whistles to be creative (a degree, the right tools, the best tools, the right environment, peace and quiet and the list goes on…). But the more I learn about creativity, from those who have gone before us or people we consider 'masters' in our chosen field, the more I’ve realised that you only really need a couple of basic tools. For me, the most valued tool is my drive or desire to do something. If you can harness that and push past the creative inertia that every single creative person feels, then, in my opinion, you are well-equipped!
LOVE that, Xanthe! Couldn’t agree more. I always say showing up is more than half the battle! I have some basic tools that I wouldn’t want to create without, but my curiosity and willingness to dive in and explore is what I credit for most of what I’ve created to date. Thank you so much for participating in the WIYSB series and being so open and honest about your creative journey. I certainly love knowing the reality behind the scenes and that you create such beautiful quilts and sewn goods without having an arsenal of notions and tools stashed in your studio!!
Pictured above is Xanthe with her Palma quilt. Pattern available in her shop.
_________________________________________________________________________
For more What’s in Your Sewing Bag fun, check out these guests:
Happy stitching!
xo,
Shannon
_________________________________________________________________________
PS don’t forget to sign up for the weekly newsletter so you don’t miss out on any future WIYSB guests!
This post uses affiliate links. For more info, visit the FAQ page.
How long do your quilts stay basted for before you tackle the quilting?
I generally try and get my quilts basted shortly after piecing the top. This approach usually keeps me progressing in the quilt journey. If I leave the basting for too long, the quilt top is more likely to get folded up and added to my WIP pile.
This is probably because basting is my least favourite step of the quilting journey - ha! So, getting that done and out of the way is a huge incentive to keep her moving along.
But it has happened on several occasions where I got the quilt basted and she ended up draped over the sofa until I needed the pins from said basted quilt to move other quilts forward, which gives me the incentive I need to just get her done! Surely, I’m not the only one who plays these kinds of tricks with themselves – ha!
I share all this so you understand what my intentions are vs. what the reality is sometimes. Take this blue and coral Artisan Cotton version of the Shattered Star quilt, it only took me about 5 months to finally get her quilted and bound – ha! But she got done and that’s what’s important 😉
Shattered Star Quilt Pattern available in the shop.
*This post contains affiliate links, meaning, at no additional cost to you, if you click through and make a purchase, I may receive a commission.
As a texture lover, I’m always on the hunt for new fibers that give my quilts extra dimension and hand feel. Which is why I was so excited when I first got my hands on Artisan Cottons. They have a softness to them that is similar to a silky cotton, but still has some ‘tooth’ to the grain of the fibers giving you a hand feel similar to linen, but not as textural. Since this is a cross-dyed quilter woven, there is a different coloured fiber running in the warp and weft of the fabric.
The cross weave adds a subtle dimension that a typical solid cotton lacks, but since it’s cotton there’s less wiggle to the fibers compared to linen (making it easier to work with).
The first time I worked with this collection was in the Shattered Star Table Runner and I couldn’t get enough of the colour saturation and soft feel. Which is why I wanted to show you how they looked in a full-size quilt!
Here I’ve gone with a combo of blues with a pop of coral. I almost didn’t include the coral, but then I found the Cotton + Steel Imagined Landscape Seaside Daisy print by Jen Hewett (which I’ve been obsessed with since I first laid eyes on it) sitting in my stash and I just knew this was the quilt she was meant for.
This one sat for the longest time draped over my sofa. I know, I recently said the same thing about the Which Way Up quilt – ha – and that’s because I store my basted quilts there. It’s the safest spot for them and means I only have a couple of wrinkles to press out if she’s sat there long enough.
Why they get caught there for a longer period of time is due to any number of things (deadlines shift, fabric delays happen, pandemics, you know, the usual run of the mill 😉), it’s seldom because I’ve lost interest. I’ve been wanting to see this one quilted up since I purchased that backing fabric wayyyyy back in 2019.
What’s interesting is how many different quilt designs I considered for this one.
Since I had already tackled nested diamonds in the Ruby & Bee Solids version, and organic wavy lines in the Little Town + AGF Solids scrappy holiday version, I wanted to try something new in this one.
The other Saturday after having been sick all week, I was suddenly taken with the need to quilt. All week I’d wanted to hand stitch something but didn’t have a project for the couch. When I started to get my strength back, all I wanted was a nice zen stitching session with my Juki. This quilt was already basted and primed to go.
Ultimately, it was my quilty mood that determined the design. Smooth, gentle organic wavy lines.
This time, spread out wider to allow more open space between the lines. And allowing more surface area to feel the Artisan Cottons.
The fabrics in this quilt feel amazing and I didn’t want to lose that sensation by going with quilting that’s too dense.
I kept thinking of gentle flowing streams as I was stitching, and it was beyond calming.
I have a tendency of making my binding early in the quilting journey. It seems to keep me from stalling on my projects. Once I’m done quilting, I can easily move right into binding. I love that.
What I hadn’t anticipated is that I would question my binding choice as soon as I started stitching her on.
It’s not that I don’t like the coral, you know my love for coral. It’s just that, I feel like a blue binding would have resulted in a calmer quilt and would really allow the coral in the quilt and on the back to pop. Now, I find there’s a little too much blending/ coordinating going on with the coral framing.
It’s still really pretty! And I’m super happy with how she turned out. This is the thing with quilting, there are so many decisions that can be made to affect the final look of your quilt. Something as small as the binding choice can really have an impact.
In case you want to make a similar version, here’s a full overview of the fabrics and materials featured in this Shattered Star quilt:
For more inspiration on machine quilting designs on your domestic sewing machine, check out:
I’d love to know if you’ve ever let your mood dictate your quilting decisions.
Happy quilting!
xo
Shannon
_________________________________________________________________________
Never miss a post - sign up for the weekly newsletter.
This post uses affiliate links. For more info, visit the FAQ page.
What’s your favourite way to use up fabric scraps leftover from your quilt projects?
Mine is to dive into an improv quilting session, let loose and just have fun with the trimmings 😊
It’s always an adventure and quilty challenge to see what can be made out of those cuttings.
I know it can sometimes just feel like a bunch of ‘waste’, but I promise there’s golden quilty opportunities just waiting to be discovered by you.
*This post contains affiliate links, meaning, at no additional cost to you, if you click through and make a purchase, I may receive a commission.
Remember the Landmark quilted wall hanging I shared with you a few weeks ago? Well, I still had plenty of fabric scraps leftover and I was curious to see what could become of them. I was particularly curious to be doing some improv with the colour brown! Not my typical go-to colour, but I challenged myself to use it in the Landmark quilt and I wanted to see it’s potential in an improv quilt.
While the piecing was not as complex as some of my previous improv pieces (looking at you Improv Cloud Surfing Wall Hanging and House of Cards quilt), there were several partial seams that needed to be contended with. Beyond that, this one was a breeze to stitch together.
My goal was to retain some of the structure and clean lines featured in the original Landmark quilt pattern, without it being as orderly.
Once I had the top pieced together, I was excited to dive in and add all the quilty texture with lots of big stitch hand quilted details. This was one of the few projects I brought up to the lake with me when we first self-isolated due to the COVID lockdown. I loved having both the Landmark wall hanging and this improv wall hanging to work on. There’s something very soothing about settling in for a hand stitching session.
What was even more fun though, was switching up my hand quilting style. On the Landmark wall hanging, my stitches enhanced the inherent geometrical nature of the design of the quilt pattern. While on the improv version, I opted for more organic improv stitch work to see how that would add dimension and movement to the quilt. I do love those curved stitches!
One of the things I love about using solid fabrics on the back of my quilts is seeing my stitch work pop. I keep meaning to make a whole cloth quilt entirely hand stitched so that I can see this approach in full effect.
Along the way, my creative goal with these was to create two wall hangings using the exact same fabrics and thread choices but approaching one entirely in a planned way and the other entirely improv. Since I felt the Landmark quilt needed faced binding to allow the buildings to extend into infinity rather than be cut off by binding, I opted for faced binding on the improv version too! It makes for a really clean effect and allows the design to ‘float’.
Here’s a full list of the fabrics I pulled solely from my stash for this one:
For more hand quilted inspiration, check out these posts:
I hope this has inspired you to think about the quilty fun you can have with your quilt project fabric scraps. If you need additional inspiration, I’d love to give you and your guild members a lecture on Improv Through Pattern Project Scraps. And if you need help in taming your scraps, then take the free 7-day Scrap Sorting Challenge!
What’s your favourite way to use up your fabric scraps?
Happy quilting!
xo
Shannon
_________________________________________________________________________
Never miss a post - sign up for the weekly newsletter.
This post uses affiliate links. For more info, visit the FAQ page.
Have you got fabric scraps?
If you’re a quilter then you 100% have scraps – ha!
It’s a natural by-product of creating a quilt. And if you’ve been quilting for a little while, then those trimmings have probably started to accumulate into piles!
Which is why having scrap busters in your quilty pattern chest is key in plowing through those piles.
But finding a graphic modern quilt pattern that plays well with a scrappy colourway can be tough.
Which is how the scrappy version of the Plus Infinity quilt came about!
The updated Plus Infinity quilt pattern is now available for instant digital download in the shop.
*This post contains affiliate links, meaning, at no additional cost to you, if you click through and make a purchase, I may receive a commission.
See, I don’t normally do scrappy.
Working with scraps – all the time.
Working with only scrappy scraps – never.
You might be sitting there thinking “um, Shannon, what’s the difference?!”.
Most of my improv quilts are made using scraps leftover from a specific quilt I just finished making. For example, the House of Cards quilt is made entirely from remnants of my geometrical Flight Plan quilt.
Scrappy means diving into your fabric scraps that have been jumbled together and making a quilt solely based on scraps found in your scrap stash.
There’s also a third scrappy option, which entails just randomly using the scrappy scraps without any real planning or curating.
In fact, this was the first true scrappy quilt that I made, and I don’t know if she ever would have happened had I not just completed the 7-Day Scrap Sorting Challenge!
It was back in March 2020 and my scraps were overwhelming me. The basket next to my sewing table was overflowing with remnants and was in desperate need of a sort through.
Taming your fabric scraps can be daunting. Where do you even start? Which is why the 7-Day Scrap Sorting Challenge is so helpful. I walk you through sorting your scraps by colour so you can then see how much you have on hand and what storage solutions you need.
Once I had my scraps all rainbow sorted, I was ready to dive in and start using them.
I first tackled these fun improv bins from the *Sunday Morning Quilts book. I love these bins and seeing them in my fabric cabinet induces instant happiness!
But I still had a mountain of fabric remnants that were beckoning to be used.
So, I dove in and decided what I really needed was a scrappy Plus Infinity quilt. It had been awhile since I made my last one and I was itching to see what she’d look like all scrappy.
While I LOVE working with scraps, this scrappy fabric play session was one of the best trips down quilty memory lane 😊
As I was selecting my prints, cutting and stitching, I really enjoyed revisiting the textiles I’d worked with before, and seeing them paired in new ways was super inspiring.
While scrappy quilts are a lot of work to get cut, the slower process and time reminiscing was really quite relaxing and enjoyable. One of the ways you can speed up the cutting time is by cutting your scraps into pre-determined sizes. I share more about this approach in the 7-Day Scrap Sorting Challenge. I tend to keep me scraps whole (i.e. I don’t cut them down) as I like keeping my options open; however, I may revisit this approach as I continue in my journey as being able to pull out containers with the pre-cut sizes I need would be pretty genius (and so much quicker too!).
I think this one comes back to the types of projects you make. You know me, I’m all about approaching your quilty practice in a way that makes sense to you.
When it came time for the central plus, I was in a little bit of a pickle. I didn’t have that much on hand to choose from and was caught between a blue print and the purply pink I ended up going with. Here was my thought process.
I had stocked up on some linen during a Black Friday deal back in 2019 and, while I hesitated for a nano second on using this *dark gray Essex linen with the most gorgeous turquoise thread woven through as the backing, I quickly recovered and reminded myself to use the fabrics I love rather than saving it for another project. It reminded me to:
I had the best time quilting her up. I was originally just going to go with some super simple straight-line quilting, but then when I thought about the scrappy nature of this quilt and all the colours featured, I decided to play those elements up.
Which is why I opted for a different coloured thread in each of the quadrants. Pink thread for the pink quadrant, blue thread for the blue and so on. But I not only played with coloured, I also included lots of different thread weights and quilting techniques to add in all the quilty texture. Here’s how the thread play worked out:
The pink quadrant got machine quilted with 50wt Aurifil Thread in the colour *2425 Bright Pink (this is a crazy versatile colour that I’ve featured here, here and here in just the last few projects). I then added some big stitch hand quilting using 12wt Aurifil Thread again in the colour 2425.
The blue quadrant got entirely machine quilted with 40wt Aurifil Thread in the colour 6738 Peacock Blue. Then I added some big stitch hand quilting using pearl cotton thread in size 8.
The purple quadrant was machine quilted using 50wt Aurifil Thread in the colour *2520 Violet. I then hand tied the quilt (a first for me) using purple and lilac coloured embroidery thread.
The green quadrant was machine quilted using 40wt Aurifil Thread in the colour *1231 Spring Green. With a mix of little quilted pluses and big stitches added using pearl cotton in size 8 for added texture and dimension.
The central plus was quilted using 40wt Aurifil Thread in the colour 1148 and 5006 (this *set would work too). Why two different shades of turquoise?! Well, I was having problems winding my bobbin at one point and I had 3 or 4 lines left to quilt in the central plus. To avoid any bobbin winding issues, I went with the path of least resistance and used the light Turquoise since I already had a bobbin wound 😉
Not at all planned, but in the end, this one is kind a quilt sampler featuring all the different quilting stitches!
Can you believe I temporarily forgot about this gorgeous ombré binding I created! This is the hazard of making the binding in advance – ha! As I was quilting her over the holidays, I couldn’t remember whether I already had the binding made. And then the fun of seeing this ombré binding again and getting excited all over again once I remembered about her! I’ve never been more excited to get a binding on a quilt before! This was definitely the cherry on top of an epic and super fun quilting journey.
I love it even more that the binding is all made from leftover binding strips from previous projects. The scrappy theme continues!
So, that’s it! That sums up my first true scrappy quilt and I can see the appeal. There will no doubt be more scrappy quilts in my future 😉
If visual is more your thing, I walk you through how the scrappy version came to be, the different threads I featured and some tips on how you can make the Plus Infinity quilt your own. See it in this video:
What I discovered from working on my first scrappy quilt is that it’s like a trip down quilty memory lane. Not only was it fun to revisit old prints and think back to the original quilt they were featured in but seeing them all pieced together reminds me of a charm bracelet my grandmother gifted me. Hers was filled with gorgeous trinkets from her travels around the world – a fave was the jewelled pineapple. Sadly, it was stolen when our place was robbed many years ago (yup, they walked out with our 300lb safe – whaaaaa?!). But I still remember it, and this quilt, makes me think of it all the more. Funny how a quilty project with nothing to do with my grandmother’s charm bracelet, has been the very item I’ve thought about during this quilty journey!
I hope this encourages you to dive into your scrap bins and start using those remnants. I truly believe that scrappy projects are bonus projects you get from your fabric investments. It helps maximize your fiber dollars and keeps material out of the landfill. Even better is that you now have a functional piece of art that is ready to provide comfort and warmth.
The Plus Infinity quilt pattern has been updated to include instructions to make your own scrappy version. I also took the opportunity to update the pattern with some additional tips and a few more step-by-step graphics for ultimate quilty success.
I’d love to know -- what’s your favourite part about making scrappy quilts?
xo,
Shannon
PS don’t forget to take the FREE 7-Day Scrap Sorting Challenge to get your scraps tamed!
_________________________________________________________________________
Never miss a post - sign up for the weekly newsletter.
This post uses affiliate links. For more info, visit the FAQ page.
Do you feel guilty about your WIPs?
Too many on the go? Feeling like you’re scattered? Feeling like you’re neglecting your makes?
I waver in and out of these feelings, but generally approach my work in progress pile as something that’s ongoing and ever evolving. Overall, I try not to stress about it.
Take this modern improv quilt, she first got started back in 2019. I’d just finished designing the Flight Plan quilt and needed a little improv in my quilty life! I first tackled the House of Cards quilts with the scraps leftover from my Geometrical Flight Plan quilt, but I also had all these orphan blocks from all the tests I did for the Flight Plan quilt pattern templates.
I’m not sure I’ve approached an improv session with so many orphan blocks. It was a first and super fun to see how to bring all the pieces together.
It’s been a while since the Which Way Up quilt got pieced and basted. She’s actually been draped over the back of my sofa for ages now. I won’t dwell on just exactly how looooong it’s been – ha! What’s important is that I got back to her 😉
*This post contains affiliate links, meaning, at no additional cost to you, if you click through and make a purchase, I may receive a commission.
My plans for quilting her up changed entirely at the last minute.
I originally intended to machine quilt her in *28wt Aurifil Thread in the colour Dove. It’s a very soft pale gray that is just stunning. That was my plan all along until this past holiday season. I was packing up to head to the lake and I knew I had my scrappy Plus Infinity quilt to finish up, but I like to have back-up projects with me, in case I make good progress on the other. So, I decided to pack her up on the off chance I wanted something to hand stitch.
With my morning makes primarily focused on hand quilting, I find myself making great headway on my quilts. I got the Plus Infinity quilt all stitched up in record time and turned to this pretty for some quiet meditative improv stitch work.
It’s been glorious working on her these past couple of months.
One thing I love about the Aurifil Artisan challenges is that I always see them as an opportunity to explore and try something new. I thought I was ahead of schedule, thinking this wasn’t due until May, only to realize it was the February challenge – oops! Good thing I was already at the binding stage when I made that realization 😉
Since I’m ever on a quilty texture analysis, I opted to explore incorporating texture through hand quilting with various thread weights. Four of them, to be exact!
I decided to sneak some Aurifloss, 12wt and 28wt + a little pearl cotton for some extra dimension.
Here’s how they line up in terms of thread weight. From thinnest to thickest:
In case you haven’t tried hand stitching with these thread weights, I thought I’d give you a deeper dive on how you could feature them in your own projects.
Let’s dive in!
I first pulled some 12wt in Turquoise, Pink, White and Cream. I didn’t want to deviate from the colourway of the quilt but wanted colours that would coordinate while giving me the chance to focus on the added texture they could provide.
12wt is one of the first threads I started hand stitching with – you can see her featured in the Pink Lemonade quilt.
What I love about 12wt is that it gives a nice prominent stitch without a crazy amount of pressure on your hand.
Burying knots is so much smoother than a thicker thread, such a pearl cotton or Aurifloss, is.
It’s kinda the best of both worlds, if you would. Chunkier stitch without too much hand quilting fuss.
I adore the added dimension and texture Aurifloss adds to my quilts.
You can use her like embroidery floss, where you pull the strands apart and only use a few at a time. However, I like to go all in with her and use all strands at once. I will give you a heads up, this one can be more challenging to stitch with.
First, because the fibers aren’t wound as tightly, they can pull through your quilt at different speeds, leading to potential for more tangling and stray fibers that you need to pull through individually.
Burying your knots can also be a little tough as the size of the knot is thicker due to the number of threads. I noted needing to be gentle yet still quite firm when popping my knots. There were times I was concerned about tearing my fabric. A note to go slowly if you give it a go 😉
But if you’re looking for a really prominent stitch, this does it perfectly!
This was my first-time hand quilting with 28 weight thread. I wasn’t sure quite what to expect, but my intention in including it was to add variety in the thicknesses of my hand stitches and I had a feeling 28wt would give some pretty highlights and delicate details to the quilt design. She did just that!
If you want nice smooth delicate stitches, without any pressure on your hand, then 28wt is a beautiful option.
When it comes to big stitch hand quilting, pearl cotton thread gives you that chunky fiber texture, but you do have to work a liiiiiittle harder for it compared to the 12wt,. Although, not nearly as tough on your hand as Aurifloss.
This improv quilt is entirely upcycled from previous quilt projects. Most of the fabric scraps are from my mod-rose Modern Aztec quilt, while the turquoise I’m pretty sure is trimmings from my Tribal Diamond quilt backing. Here’s a full run-down of what I featured in the Which Way Up quilt:
For more inspiration, I shared a little more about my love for the different thread weights you can play with in this post and video. And for more hand quilting inspiration, check out these projects:
Happy stitching!
xo,
Shannon
_________________________________________________________________________
Never miss a post - sign up for the weekly newsletter.
This post uses affiliate links. For more info, visit the FAQ page.
This one’s for all my tactile lovers!
I know I’m not alone in loving the feel of all the yummy fibers we get to work with in our quilting journey and today’s What’s in your Sewing Bag guest knows a thing or two about gorgeous textiles.
I’m not sure how I first stumbled on Shelagh’s gorgeous Instagram feed, but I was hooked from day one! Her creative journey over at Stuart Moores Textiles is filled with her very own hand dyed fibers. That alone sparks my curiosity, but then add in her beautiful hand stitching, mending, knitting and sewing and it’s all the textile eye candy you can handle!!!
Her passion for her craft is contagious! Which is why I’m so excited for you to get to know Shelagh’s creative journey all while sneaking a peek at some seriously gorgeous fibers.
Introduction – tell us a little about yourself! How did you get started on your quilting journey?
Hello! My name is Shelagh (pronounced Shay-la) and I run Stuart Moores Textiles (Stuart was my great grandfather). My quilting journey started a long time ago and I would say my journey really started when I had piles and piles of hand dyed fabric and needed to do something with them. I am at heart a dyer; I love to mix up colors and create combinations that can’t be found anywhere else. I really like to put together color combinations and quilting was a perfect next step on my creative journey.
I adore your hand dyed fabrics; they always make me want to create – and that’s always a good thing 😉
What kind of sewing bag do you have? (e.g. did you make it? Buy it?)
I have so many! But they are not all bags. I make large market totes out of plant dyed fabric and I use those a lot when I am running around town. I can keep my projects in there along with anything else I need for the day. I always try and have at least one project on me at all times. I have a young child and when he falls asleep in his stroller or in the car, I use that time to stitch (instead of sitting in the parking lot scrolling on my phone). It depends on what I am up to, but I like to always have at least one project on my person (aka in my tote bag) for unexpected down time. Besides my tote bags, I use a lot of baskets for projects. I actually prefer them now and carry them out to the car with me when we leave the house (even if it’s only to go to the market and back). I use baskets that are shaped like serving trays and just carry them around the house with me and around town. I like being able to work on something, put it down, and then pick it up right where I left off and continue working on it (even though I’ve changed venues). Sounds crazy but I found this method saves a lot of time.
What a genius way to stay creative and sneak in some stitching time! As I was reading that, I totally had visions of you walking around your town with your tray of hand stitching goodies – such a lovely image! I don’t have many trays, but I do love using plates and bowls (mainly ones I’ve picked up on my travels) to keep my WIP organized. But you’ve got my mind going with your tray solution!
What are your all-star essentials? Your tried-and-true must haves that you can never run out of?
My sewing pouches are always on me. They have everything I need at the ready and I can throw them in any bag or basket without having to find my bits and bobs every time I want to take a project with me. I started making them about ten years ago when we were always in transit and I don’t leave the house/town without them today.
I love sewing pouches for exactly this reason too! They’re genius at keeping all the essentials in one place and easy to toss in a bag before heading out the door.
What is your favourite item in your kit? Why?
Since my son was born, I mostly do hand sewing and the perfect needle for every job is really important for me. So, I always have a lot on me.
It’s funny you should mention having needle options, as my own hand sewing exploration has introduced me to all the options out there. Turns out you really do benefit from different types of needles depending on the sewing task at hand!
What’s one thing we’d be surprised to find in your bag?
I think the most interesting thing one might find in my sewing bag is just the wide variety of my projects. I really love so many textile arts, the more traditional/historical the better, so at any moment there are bound to be a vast array of tools, fabric, yarn, and floss.
Multi-passionate creative!!! Yes! I love hearing that! Plus, I know from following your IG feed that you’ve got some pretty spectacular and unique fabric, yarn and floss tucked in there 😉
When do you find yourself using your kit the most? (Travelling, on the sofa, attending sew-ins?)
Where I go, so goes my sewing bag/basket! I have lost all ability to be embarrassed crafting in public and I do it all the time.
I love your energy and enthusiasm for your craft. I can feel it just by reading your responses and that in turn gets me excited! I adore being creative too and love taking my projects with me. It feels lovely to be connected with another maker who just adores the process of creating.
What’s your favourite travel memory with your sewing bag?
Almost every time I go through the bag scanners at the airport my sewing bag gets flagged for a hand inspection. The look on the face of the security agent for the first twenty seconds when they are doing the inspection (and have absolutely zero idea what, for example, my circular knitting needles etc. are for) is always priceless. 99% of the time they go to ask a superior if I can bring ‘this stuff’ on the plane and many times someone will recognize what it is and say, ‘You sew/knit/cross stitch/ needlepoint? Me too!’ and we all have a good chuckle.
Hahaha – priceless!! At least they haven’t confiscated anything – that’s always my worry!
Tell people where we can find you?
I am on IG at StuartMooresTextiles and also on YouTube (again Stuart Moores Textiles) for tutorials. Our website is www.StuartMooresTextiles.com. Our website is under construction at the moment, so we have a shop up on Etsy https://www.etsy.com/shop/StuartMooresTextiles until it’s finished being redone.
Oh, good to know you’re in the middle of an update. Look forward to seeing the new site!
Anything else you’d like to share?
Not that I can think of, thanks for including me!
Oh, thank YOU, Shelagh! It has brightened my day reading your lovely responses and feeling your passion and love for your craft. I really appreciate you sharing your creative journey with us and sharing the great idea to carry a tray around the house (and town) so we can pick-up a project exactly where we left off!
_________________________________________________________________________
For more What’s in Your Sewing Bag fun, check out these guests:
Happy stitching!
xo,
Shannon
PS don’t forget to sign up for the weekly newsletter so you don’t miss out on any future WIYSB guests!
]]>When I first started sewing, I knew very little about thread.
I knew even less about different thread weights, uses, fibers and brands.
Turns out, there’s a whole world focused just on the stringy stuff!
As my sewing and quilting journey evolved so too did my thread exploration. Plus, you know I have a soft spot for texture and thread is one of the fun ways I sneak quilty texture in!
Which is why I love sharing my love for Aurifil Thread. As you know, I’ve been lucky to be an Aurifil Artisan for the past 2 years and even I’ve been surprised by my continued learning just from a thread perspective.
Who knew thread could be so fuuuuun?! Ha!
It certainly was an unexpected love affair that really kicked off when I dove into hand stitching and quilting my own quilts at home.
The way a quilt gets quilted is a big design consideration for me, not an after thought.
Pictured above is the Shattered Star Table Runner that I quilted using 28wt Aurifil Thread. Pattern available in the shop.
I see it as an opportunity to enhance the quilt design. It could be subtle, it could be overt – either way, the thread you use and the way you use it in your quilts is another chance for you to make your quilt your own.
You probably think I’m weird when I get excited by seeing one of your completed quilt tops and my response is “Can’t wait to see her quilted up!”. That’s because I’m always so curious to see how you’ll continue to bring your own unique flare. I’ve been flat out amazed by some of the quilting I’ve seen, and it’s really encouraged me to continue to step outside my quilty comfort zone and explore new techniques and ideas.
Pictured above is my Which Way is Up quilt that I've entirely hand quilted using various Aurifil Thread weights, including: 12wt, 28wt and Aurifloss.
Pictured above is my first exploration with Aurifloss, a nice chunky weight thread that’s similar to embroidery floss. Summer Solstice Floral Mini art quilt is available in the shop.
When I first made the switch to Aurifil, I found it tough to source here in Montreal, but the options are opening up!
Club Tissus has recently added Aurifil Thread to their selection of notions and it looks like they’ve got several thread weights to choose from including: 12wt, 28wt, 80wt, 40wt and 50wt. I also spotted them in small and large spools 😊
You can hear more about why thread is so important to me in my quilting journey in Part 3 of my video collaboration with Club Tissus.
In case you missed it, here is a link to Part 1 – my quilt journey and Part 2 – a day in my studio.
Pictured above is the Pink Lemonade quilt I first machine quilted using 50wt and then big stitch hand quilted using 12wt Aurifil Thread. Pattern available in the shop.
For more thread inspiration, check out:
Happy quilting!
xo
Shannon
_________________________________________________________________________
Never miss a post - sign up for the weekly newsletter.
]]>Thank you so much for all your love and support. I was blown away by all your excitement and lovely comments on Part 1 of my collaboration with Club Tissus.
Hearing how much my quilting philosophy resonates with your own makes me feel all the more connected to you!
Isn’t it wonderful how we can be in lock down and still get to feel a connection with fellow quilters based all over the world?
I was sharing some of the messages I received with the hubz and even he commented on how lovely it is to see people genuinely routing for and supporting one another. Aren’t we lucky?!
Which is why I’m excited to bring you Part 2.
This time, I’m giving a peek at what a day at SFD headquarters is like.
Come take a look:
I hope you’ve enjoyed seeing what a day in my life is like. I’d love to know if there are daily habits you turn to, to help keep you centered and focused on your creative pursuits. Share them in the comments below!
Happy stitching!
xo
Shannon
PS stay tuned for Part 3 coming soon!
_________________________________________________________________________
Never miss a post - sign up for the weekly newsletter.
]]>Do you ever stop and think about how many new friends you’ve made through Instagram?
Our quilting community truly is awesome. I know, I rave about it all the time, but I can’t help it. I don’t think I’ve ever met a more caring, helpful, inspiring and supportive group before. And I consider myself super lucky to be a part of it!
Which is why when Wendy, from The Weekend Quilter, reached out to invite me to participate in testing for her Urban Quilting book, I was ALL in to support her!
We met on Instagram and have been encouraging one another ever since 😊
As with most books, they take awhile to plan. So, this quilt project actually started back in early 2020, well before we knew anything about COVID.
So, the evolution of this quilted wall hanging is interesting as she was pieced pre-COVID but hand quilted during lock-down while self-isolating by the lake. This is just one of a few hand quilting projects I brought with me and helped see me through that really strange and stressful time. A great reminder of the health benefits quilting can offer us!
*This post contains affiliate links, meaning, at no additional cost to you, if you click through and make a purchase, I may receive a commission.
Here are just some of the fun features I noted while perusing this modern quilt book:
There are 10 modern quilt patterns to choose from. You really can’t go wrong with any of the modern designs!
I love that Wendy includes several colourways for each of the patterns. If picking fabrics is a challenge for you, Wendy takes the guess work out!
There are lots of quilty tips sprinkled throughout the 150 pages.
There’s an entire section on spray basting and machine binding! Yup – we can all use some tips on those steps 😉
The pattern I opted to make is the Landmark quilt, which is inspired by the 108 St Georges Terrace building in Wendy’s hometown of Perth, Australia.
I had such a fun time stitching her up!
She’s super quick. Super easy. And, above all, super FUN!
Perfect for beginners to get a good handle on cutting and strip piecing, but always cool for advanced quilters to play with the colourway. Lots of fun to be had there.
I stepped outside my quilty comfort zone and explored brown. I forget who, but there was a quiz or question on Instagram about our least favourite colour and my response was “it used to be hands down brown, but then I played with *Curry and I’ve been open to it ever since”. Shaye (from Studio McGee) even mentioned it in one of her videos and this post saying it was making a comeback. And then Friday’s Off Fabric invited me to be a guest Kona bundle creator and challenged me to use brown. Clearly, brown was on my radar! Well, this is the project I finally explored that curiosity to see what I could do with brown.
Knowing me by now, you know I also had to sneak in some texture. And this time, it was all about denim + linen + linen. Yes, there are 2 different types of linen in there + an AGF denim. Some of these I had just played with in my Cloud Surfing quilt, but I couldn’t resist including them with this pairing. It just all came together so organically. Well, I did hum and haw a little on whether to go with denim or white as the background. But I was drawn to the earthiness and depth the denim offered. So, I went for it. A little unsure where it would land but determined to see what I could make of it.
Here are some highlights of my impressions after making the Landmark quilt:
That’s sometimes exactly what you want in a quilt pattern – quick make with a super satisfying result.
I’ve shared my love for morning makes with you before, and one of the best ways to kick off the day is with a nice cup of coffee and some hand stitching while watching the sunrise. If you haven’t tried it, I highly encourage you to give it a go.
It was starting my mornings in this manner that helped me during that initial lock-down.
The rhythm of the slow stitching physically reminded me to slow down and just enjoy the process. It was quite soothing!
I kept the quilting quite linear and simple as I didn’t want to compete with the linear nature of the pattern, rather I wanted the stitch work to highlight the design of the Landmark pattern.
It’s a beautiful simple design that appeals to my appreciation of “less is more”.
I opted to go with the denim on the back for a seamless look.
The dark indigo allows the hand quilting design to pop, which I really love.
This is what I love about pearl cotton thread -- the prominent stitch it offers. Just look at that quilty texture! Yummy nummy 😉
She sat unbound for the longest time as I was caught up at the lake without my sewing machine. But that also gave me time to think about how I wanted to finish her off.
At the time, I had recently given faced binding a go on my Guiding Lights Mini Wall Hanging and really loved the effect it offered. I wanted to explore that a little more + I felt it was a good compliment to the design. The bottom buildings look like they go to infinity, without any bottom barrier stopping them. I felt it allowed the original design to shine without any borders.
Here’s a full list of the fabrics I pulled solely from my stash for this one:
For more quilted wall hanging inspiration, check out these posts:
I can’t express enough how quick this lil’ cutie was to stitch up! You can now grab Wendy’s gorgeous *Urban Quilting book and dive into these modern approachable designs for your own home!
Happy quilting!
xo,
Shannon
_________________________________________________________________________
Never miss a post - sign up for the weekly newsletter.
This post uses affiliate links. For more info, visit the FAQ page.
Have you ever found yourself refreshing your browser for the status update on a shipment you’re eagerly awaiting?
As if the act of refreshing the page will somehow encourage the status bar to magically progress more quickly!
That was me this entire past week waiting for the arrival of a parcel.
And then - it finally arrived - juuuuuust as I was packing up to leave the city for a few days. Isn’t that always the way?! I do love it when I intercept a package instead of having to traipse to the local pharmacy for retrieval 😉
I’d been waiting for the latest issue of Curated Quilts Magazine to show up ever since I found out last fall the original Plus Infinity quilt was being featured in their Plus issue – wahoo!
*This post contains affiliate links, meaning, at no additional cost to you, if you click through and make a purchase, I may receive a commission.
This quilt got designed when I’d only been quilting for 2 years. The length of time really isn’t all that important, I mention it only because I realize how ‘new’ I was to quilting – ha!
What I love is that she came to be through the evolution of a design that initially started through playing with fabric scraps.
Surprise, surprise right?! I know, I have a weakness for them. What can I say, they perpetually inspire me. (I even offer a virtual lecture on the topic)
I’d just designed the Spring is in the Air quilt pattern and I had these pretty trimmings just sitting there.
The colours and prints in Tamara’s Frolic collection were just so uplifting at a time that I really needed some cheer!
That play session led to the Rainbow Plus mini quilt (which became the Plus Infinity mini quilt). Those pluses were just too cute I wanted to explore that plus design further and see how I could play with depth and repetition using the one design element. The Plus Infinity quilt is the result of that exploration. It's a series of pluses, in various sizes, within one another. It's my quilty version of a hall of mirrors - here, the pluses go on into infinity.
So, when RJR Fabrics reached out to invite me to participate in their What Share Are You blog series, I knew instantly it would be the Plus Infinity quilt that I would finally bring to quilty life!
What I didn’t expect was that I’d end up playing with greens and blues instead of all the shades of coral – ha! You can read more about how I went from 100% being sure I’d play with all the shades of coral to somehow wind up playing with all the green and blue hues set against the softest shade of yellow in this post.
The plus motif is so much fun to play with and Curated Quilts Magazine’s Plus Issue does a fantastic job of showcasing all the quilty fun you can have. For all the modern cross quilt inspiration, grab your copy of *Curated Quilts here and save 10% with code KK2DFC!
What colours would you feature in your Plus Infinity quilt?
Happy quilting!
xo
Shannon
_________________________________________________________________________
Never miss a post - sign up for the weekly newsletter.
This post uses affiliate links. For more info, visit the FAQ page.
I’m so excited to be welcoming you into my sewing studio today!
I’ve had the lovely pleasure of collaborating with Club Tissus (a local family run small fabric store chain here in Quebec) as a special guest for their Quilt Week running from January 21 through January 31, 2021.
Club Tissus happens to be one of the very first fabric stores I started shopping at for all my fiber goodies when I started sewing back in 2011. At that time, it was so difficult to find the type of fabrics I was on the hunt for and Club Tissus came to the rescue! I can still remember standing in their linen section happy as a clam trying to resist buying allllll the bolts – ha!
When I was designing my blue Dresden Quilt (which was the second quilt I ever took on), I turned to their helpful staff to guide me in how much fabric to buy to cover my project needs. This was before I knew anything about quilty math and calculating yardage (or meters, as we tend to use here in Canada) for quilts. Walking out with my stack of textiles was so exciting and I loved that I wasn’t short on any of the colours!
So, when Club Tissus approached me with the idea of creating a film to take you inside my creative space and share a little more about my quilting journey I was ALL in! Not only was I getting to support a local supplier who helped me in my early sewing days, but I was so excited to get to bring you into my quilty world through film!
If you’ve been wondering what things look like behind the scenes here at SFD Headquarters, then today’s your lucky day!
Come take a peek inside my creative space.
Happy viewing!
I'd love to know your thoughts! Was there anything that surprised you in the video? Share in the comments below!
xo
Shannon
PS stay tuned for Part 2 coming in February!
_________________________________________________________________________
Never miss a post - sign up for the weekly newsletter.
]]>Surprise!
January’s your lucky month to get two sneak peekies inside inspirational maker’s sewing bags!
You loved the cleverness of In Color Order’s sewing bag of choice and today’s guest brings you clever ideas on what to pack inside your on-the-go bag 😉
This time we’re heading to New York City to visit with Wendy from The Weekend Quilter.
Wendy and I first met on the gram (as one does) and I was instantly taken with Wendy’s energy. I love passionate people and I could tell she had it in spades. Plus, she designs some über gorgeous modern quilts!
So, of course I had to reach out and invite her to participate in the What’s in Your Sewing Bag? series so you could get to know her and her kit too!
*This post contains affiliate links, meaning, at no additional cost to you, if you click through and make a purchase, I may receive a commission.
Introduction – tell us a little about yourself! How did you get started on your quilting journey?
I’m the gal behind The Weekend Quilter. I’m based in New York City and design modern quilts and write quilt patterns to share my passion for quilting and inspire a new generation of quilters. I’m also the author of Urban Quilting, and co-host a quilting podcast called Quilt Buzz.
My quilting journey began in 2015 in my parents’ dining room. My sister spent her time there making quilts for friends and family. Watching the process unfold sparked my interest. Which led me to teach myself to quilt with the basic sewing skills from high school home economics class.
I didn’t join the Quiltstagram till 2017. The Weekend Quilter didn’t start off as a business. It was my creative outlet and a way to connect with other quilters to hold me accountable for living a more balanced life between work and play. Hence the name.
In 2018, I got married to an American and relocated to New York City from Perth, Australia. During the first 11 months of living abroad, I was not able to work or start a new business because of my visa status. In those 11 months, it allowed me to reconsider my career in the corporate world and put 110% into creating content and building The Weekend Quilter brand.
Today I have taken a creative career path. You can find my quilt patterns and quilted home goods in my online store. My work has been featured in various craft publications and blogs including Mollie Makes magazine, Love Patchwork & Quilting magazine, LoveCrafts.com and Fabric.com. More recently, I have published my first book called Urban Quilting.
I love that it’s your sister that introduced you to quilting, Wendy! I also remember when you made the move to NYC and thought “gosh, how fun to be kicking off a new journey in NYC!”.
What kind of sewing bag do you have? (e.g. did you make it? Buy it?)
Funny thing. It’s actually the same LL Bean tote bag as Amanda’s from Broadcloth Studio. She’s a great sales person. Thanks to her, the Quilt Buzz team each have matching bags. Totes cute, right? (pun intended, btw).
What I love about the tote is, it is light weight, big with some structure to hold up well on its own, but it’s still flexible to fit virtually anything, including large quilts for quilty photo shoots and excursions.
I love a good practical bag! Especially one that fits large quilts 😉 I’ve been eyeing it since Amanda mentioned it during her WIYSB visit!
What are your all-star essentials? Your tried-and-true must haves that you can never run out of?
The latest quilt (Plaidful Quilt available from Jan 28), camera, tripod and spare battery are on the top of my list when it comes to packing my quilting bag.
I recently got into hand quilting thanks to my summer catch ups in the park with Amanda and Sarah, another quilty friend of ours that Amanda met at a quilting workshop at Gotham Quilts. So, I now also pack these with me:
Oh, I love Brittney’s work! Lucky you to have your own one of a kind sewing bag! Also, super happy to hear you’ve joined the hand quilting lovers club 😉 It truly is a wonderful creative technique.
What is your favourite item in your kit? Why?
My camera (*Fuji Film X100T). I bought it about 7 years ago for travelling. It’s a light compact DLSR with a vintage look. The Wi-Fi function is so handy when you’re on the road and want to transfer photos straight on to your phone to post on Instagram.
I also love the remote-control phone app. You simply attach the camera on the tripod, connect the camera to your phone via. Wi-Fi and put the timer on and snap away! This is perfect for photos when you don’t have a second pair of hands to take photos, and you and your quilty friend can be part of the frame. Here’s an example of when I used this function:
I’m controlling the camera from my phone in my left hand 😉
So COOOOOOL! I’m going to have to check this beauty out! Light weight and has a remote – yes, please!
What’s one thing we’d be surprised to find in your bag?
My headband.
I always break my hair ties so I keep a headband in the bag just in case, to put my hair back while I’m working on my hand quilting projects. It also doubles up as a face mask.
Ok, we need to schedule a chat about all these double duty products you’ve got going on. A headband that’s also a mask – genius! Plus, it’s cutie petutie! My big question is, does it give you a headache? I stopped wearing headbands because they’d dig in behind my ears and give me a headache ☹
When do you find yourself using your kit the most? (Travelling, on the sofa, attending sew-ins?)
When I’m out and about taking quilts in the wild shots. Though there’s been a lot less of that since the pandemic. I hang out with my quilty friends virtually these days and my husband doesn’t really have the patience when it comes to taking quilt photos.
I get it, hopefully we’ll be back to road-trippin’ soon and taking all the quilts in the wild shots!
What’s your favourite travel memory with your sewing bag?
Hands down, taking the train out to Philly with Amanda to meet Anna from Wax and Wane Studio. It was a great trip because I finally met Anna in person after talking to her on Instagram DM for nearly a year, and it was my first time in Philly. The three of us had so much fun roaming around the streets, admiring the architecture and taking quilty photos around the city.
This is us at lunch (from left to right: Anna, Amanda and I). And of course, my quilt bag makes it into the photo!
I love it! Both Amanda and Anna shared the same story during their WIYSB visits and I’ve been jelly ever since – ha! Seriously looking forward to the day all 4 of us get to hang out – our Quilt Buzz chat was the closest we came – but I want face-to-face IRL!! 😊
Tell people where we can find you?
You can find me on Instagram and Pinterest (@the.weekendquilter) or through my website the-weekendquilter.com
Anything else you’d like to share?
Hang out with Amanda, Anna and I every other Thursday on Quilt Buzz. Listen to the latest and previous episodes on all the major podcast directories including Apple Podcasts, Spotify, Google Podcasts and Stitcher.
And you can grab a copy of Urban Quilting from major retailers including *Amazon, Walmart, Target, Barnes and Noble, Book Depository and many more. I also have signed copies in my online store. But you’ve got to get in quick, because they’ve been walking out the door and I’ve limited stock of it.
Congratulations on publishing your first book, Wendy! She’s a beauty and I’m so thrilled I was able to play a small part in helping you test the Landmark pattern.
Thank you for sharing your quilt journey with us and giving us so many fun gadgets to consider stocking in our own sewing bags!
_________________________________________________________________________
For more What’s in Your Sewing Bag fun, check out these guests:
Happy stitching!
xo,
Shannon
_________________________________________________________________________
PS don’t forget to sign up for the weekly newsletter so you don’t miss out on any future WIYSB guests!
This post uses affiliate links. For more info, visit the FAQ page.
How’s your quilty to-do list coming along?
Mine seems to be ever expanding – ha!
So, before diving in to all the new quilts I want to make in 2021, I thought it would be fun to take a moment to look back at the quilty projects I was able to complete in 2020.
Now, 2020 was a strange year in that I was away from the sewing studio for more than 6 months. Whaaa? The fact that I got anything quilted and finished last year is pretty remarkable!
It also served as a great reminder that no matter what crazy hurdles life throws our way, we can always sneak in some creative time 😉
Let’s dive in (or, skip to the end for the video)!
*This post contains affiliate links, meaning, at no additional cost to you, if you click through and make a purchase, I may receive a commission.
I kicked off 2020 by finishing up my lap size Cloud Surfing quilt. This was a fun collaboration between Jenny from Papper Sax Sten, Art Gallery Fabrics and myself. Jenny was kind enough to send me her oval drunkards path rulers to play with and I had the best time designing new quilt ideas featuring those templates. Coming out of that play session, I was most fired up to make the Cloud Surfing quilt. I’m so happy I did because not only was she a fun quilt to design and piece, but I’m also so excited that she’s heading to QuiltCon 2021!!
Pictured above is the Cloud Surfing quilt pattern available in the shop.
And since so many of you have reached out to say how much you love the design but are a little intimidated by all the curves, I’m hosting a virtual Cloud Surfing workshop (join the workshop here) to help you take the fear out of quilting curves!! That’s right, you can come quilt with me and a few other students to tackle this modern abstract quilt!
Once I had both the lap and baby Cloud Surfing quilts made, I was eager to dive into an improv quilting project. This time, I opted to feature some of the fabrics from the baby Cloud Surfing quilt paired with the AGF premium linen from the lap one.
I then went to town hand quilting her in a variety of thread weights to up the quilty texture.
You can read more about this hand stitched modern wall hanging here.
I had the pleasure of testing out the Landmark quilt pattern for Wendy of The Weekend Quilter as part of her new *Urban Quilting book!
We have such amazing talent in our quilting community and getting to support fellow makers is just the best!
You can read more about this pretty here.
I’ll be sharing some more details with you on this one, but suffice to say I had the best time playing with the scraps leftover from the Landmark quilt 😉
This is the second one I’ve made and it just keeps getting better! I owe you this pattern and I’m hoping 2021 is THE year. Plus, I haven’t told you yet, but she’s got a twin. I’ve got a fun stack of fabrics sitting there patiently waiting for me to get through some deadlines and then I’m diving in to the Lunar Eclipse quilt!
I released this cutie early in 2020 and then promptly left the city – ha! When I got back to the city in the early fall, I created a video tutorial for Simple Simon and Co. fall session. It was so fun to work with the scraps leftover from my Ruby & Bee solids Shattered Star quilt!
I then went on to make a whole bunch more as gifts for the holidays. You can read more about those here.
Pictured above is the Sit 'n Sew Pincushion - pattern available in the shop.
The fall was all about making all the Shattered Star quilts, whipping up a table runner, finally a quilted lumbar pillow that had me diving into the fun world of inserting metal zippers.
Pictured above is the Shattered Star quilt - pattern available in the shop.
Pictured above is the Shattered Star Table Runner - pattern available in the shop.
Pictured above is the Shattered Star Lumbar Pillow - pattern available in the shop.
If that wasn’t enough, I then launched into hosting my first ever quilt along! Designing the Shattered Star Quilt Along and the holiday fat quarter friendly version to go along with it was intense! Ha! It was amazing and also beyond challenging. It definitely tested me on all levels, but I also learned so much! Plus, getting to connect with you that like was truly AWESOMESAUCE!
Since it’s just me in my business, getting to connect creatively with other makers through collaborations is just so fun! I can’t say how much I appreciate those opportunities.
This little cutie was created after I’d been away from the studio for months. It felt good to come back and be in a creative zone – no expectations, just me, the fabric and tools and my creative instincts! Read more about her here.
The Quiltmas Elves always have the best time pulling together the free holiday blocks for you! It’s a lot of work, but we also have so much fun sneaking in all the quilty shenanigans! In case you missed the fun, check out 2020 and 2019!
It never ceases to amaze me how much time designing quilt patterns take. I’ve been working on revamping the original Plus Infinity quilt pattern and hope to have her released in the next few weeks. Stay tuned!
Pictured above is the Plus Infinity quilt - pattern available in the shop.
I’m walking you through all the quilt projects I completed in today’s video!
This is the first time I’ve rounded up my quilts for you and I’d love your feedback! Let me know in the comments in you’d like me to film more videos of the quilts I make so you can ‘see’ them better!
Happy quilting!
xo
Shannon
_________________________________________________________________________
Never miss a post - sign up for the weekly newsletter.
This post uses affiliate links. For more info, visit the FAQ page.
What is it about the New Year that seems to encourage getting organized?
I don't know if it's because you need to find room for the gifts you received, or whether it's just a need to have things orderly and feel on top of your home - especially when things outside the house feel anything but stable and tidy (thanks, COVID)!
Do you find yourself wanting to get organized this time of year too?
Whatever the reason for the urge to tidy, I’ve learned it’s best to seize that urge and ride the organizing wave while you’re in the mood!
That's probably why I couldn't resist signing up for the Sew Organized Aurifil Artisan January Challenge for the second year in a row!
It's also probably not a big surprise that my go-to Sew Organized project is my Sit-n-Sew Pincushion.
I not only adore having these in my studio, but I love gifting them too! Which is why I whipped up several before the holidays.
That’s right! Even with the craziness that is the holiday season, I was still able to sneak several of these in between other projects.
*This post contains affiliate links, meaning, at no additional cost to you, if you click through and make a purchase, I may receive a commission.
What makes these Sit ‘N Sew Pincushions so awesome is they don’t require much fabric.
Fabric scraps are the perfect go-to for this sewing project. I tend to like to use the scraps leftover from whatever quilt I’m working on (see some examples below!).
She doesn’t take long to make. You can 100% whip one up in an hour.
They’re beyond practical for keeping your most used notions handy. I keep one at my sewing machine, on my ironing board, in my sewing kit and next to the sofa (where I do most of my hand stitching).
It's the perfect opportunity to have some creative fun and try a new technique – hand quilting, matchstick quilting, free motion quilting. What quilting technique have you been wanting to try out? Now’s your chance!
You could even play with a new thread weight! When’s the last time you tried a new-to-you thread weight?
Plus, they really do make a great gift for a fellow sewist or quilter. I’ve given many over the years and they always seem to be a hit 😊
Click here to read more about how the Sit ‘n Sew Pincushion came to be!
Pictured above is the thread included in my 2020 Aurifil Artisan Collection.
Don’t you love a sewing pattern that’s versatile?
Here are just a few examples of how much of your own unique spin you can bring to these pretty and practical pin cushions.
In this purple beauty, I had some scraps leftover from making my Shattered Star Lumbar Pillow. I loved that fabric combo so much, I decided to play a little more in this pinnie.
When it came time to quilting, this one was all about having fun with 28wt. A fave of mine!
Plus, I was loving seeing how the lilac thread looked against the Aurus Pure Solid – it’s such an unexpected fun combo!
Just look at the texture 28wt creates! All created with my walking foot!
Here’s everything you'll need to make this pincushion:
A dear friend of mine has a mutual love for Amy Sinibaldi’s prints. I couldn’t resist making her one that featured most of the prints in the Little Town collection I used in my Holiday Shattered Star quilt.
I loved stitching up that strip of mini trimmings – not only remembering my own quilty journey, but thinking of my friend getting to enjoy these little prints every time she uses it too!
Here’s what I snuck in to create this one:
I’d been holding on to this gorgeous Bubbies Buttons and Blooms gray floral by Kori for Windham Fabrics for quite some time just waiting for the right project to come along. And I instantly knew when I came across the sayings in this print that I wanted to feature them in a project where the motivational sayings would be seen on the daily. And I knew exactly who I wanted to gift the pinnie to!
What better place than fussy cutting them to appear on the front of the Sit ‘n Sew hanging sleeve!
Life can be hard and sometimes it’s nice to have a reminder to “follow your heart” and “keep going”. I thought my dear friend would be touched not only by the sayings, but by the fact I made it just for her.
To make this one, I used several prints from the Bubbies Buttons and Blooms collection.
I kept the quilting minimal with *50wt Aurifil Thread #2000 Light Sand to allow the prints to shine.
I clearly wasn’t finished playing with the scraps leftover from my Holiday Shattered Star quilt as I whipped this little cutie up too!
This time, I focused more on featuring the Pure Solids with a couple of pops of Little Town.
The piecing is quite minimal in this one, so I added in more visual interest by creating a grid overlay with *50wt Aurifil Thread #5008 in Sugar Paper (what an awesome name!). This is a beautiful gray blue colour that is patiently waiting for me to feature her in my Artisan Cotton Shattered Star Quilt.
Versatile, right?!
I hope this has inspired you get the Sit 'N Sew pattern, dive into your fabric scrap bins and stitch some up for your sewing friends. It’s what quilty good times are made of 😉
Happy quilting!
xo
Shannon
_________________________________________________________________________
Never miss a post - sign up for the weekly newsletter.
This post uses affiliate links. For more info, visit the FAQ page.
Did you catch the announcement in last week’s Best of 2020 post?
While sharing that the What’s in Your Sewing Bag? series made your Top 10 list (so cool!), I sneakily snuck in that the WIYSB series is back for Season 2!
That’s right!
I’ve got another full year of What’s in Your Sewing Bag? fun planned out for you! To double the fun, they will pop up on the monthly, with some bonus months featuring two posts instead of just one – yay! Be sure to sign up for the newsletter so you don’t miss out on a single guest post!
OK – enough of the WIYSB updates, on to today’s guest!
Since my guests are never random (meaning, I reach out to fellow makers who’ve been a source of inspiration to me), there’s usually a story as to how I’ve come to know them. After all, when I started on my sewing journey, I didn’t know a soul in this industry. Which is yet another reason why I love this series. It allows me to share some of the makers who’ve inspired me along my journey in the hopes they inspire yours too 😊
Which got me wondering, do you ever think back on how you first came to meet someone?
It’s even more interesting when that person is someone you know solely online!
I’m sure I’m not alone in this. As of late, the vast majority of my new friends have been ‘met’ online. This has been made more apparent with the shutdown that’s affected us all.
Today’s guest was an interesting online journey. I originally found a picture on Pinterest of the cutest thread storage rack. I hunted down the original source and landed on In Color Order. A lovely sewing and quilt blog spearheaded by Jeni Baker. I love following her vintage finds and how she often lovingly restores them. She’s also got the cutest bunny named George. That in of itself is a fun reason to follow Jeni. And then you add her cute as a button pouches and it’s constant double tapping happening 😉
Today Jeni’s giving you a full run through of all her notions and tools she tucks away in her sewing bag!
*This post contains affiliate links, meaning, at no additional cost to you, if you click through and make a purchase, I may receive a commission.
Introduction – tell us a little about yourself! How did you get started on your quilting journey?
Hi, I'm Jeni! I learned to sew about 20 years ago and I've been quilting for the last 10 years. I love to find ways to live a creative life, through sewing, baking, gardening and even a little woodworking. The joy of making something from a few simple materials hasn't worn off and I love the feeling of making utilitarian projects that fill a need. I'm passionate about sharing everything I've learned over the years through my sewing patterns and blog.
Yes! I love the process of creating something practical out of simple materials. Sneaking creativity into my life on the daily is also an objective of mine. Simple, yet very satisfying!
What kind of sewing bag do you have? (e.g. did you make it? Buy it?)
I've used many different sewing bags but my current favorite is a toiletry bag from Target. It has all kinds of compartments to keep things organized and is roomy enough to hold a small project too. I usually toss it and a few projects in a tote bag (like my Workshop Tote Pattern), when I get together with friends to sew or attend a retreat.
How fun to use a toiletry bag, Jeni! That’s super clever!
What are your all-star essentials? Your tried-and-true must haves that you can never run out of?
My all-star essentials include a nice sharp pair of scissors, thread ships, an all-purpose white thread, sharp pins, a marking tool (or two), seam ripper, rotary cutter and clips. I usually also add in row markers, masking tape, a chopstick for turning and a small screwdriver.
I love that you included a small screwdriver in your list! It reminds me of my hubz always being on the hunt for our most preferred screwdriver and me finally saying “Oh, I’m permanently storing it in my sewing bin. You can find it there!” – ha! When I first started out, I never thought that would be such an important tool in my sewing kit! Happy you mention it 😉
What is your favourite item in your kit? Why?
A really sharp pair of snips are top of the list for me. I have a small pair by Kai that are my absolute favorite. Dull snips are a big pet peeve of mine, so a pair that is sharp all the way to the tip is important to me.
I love a tool that works! Which was one of the main reasons why I kicked off this series – to get to know fellow makers’ most loved notions. I’ve heard of Kai, but really hadn’t spent much time checking them out. I naturally went down the Kai scissor rabbit hole and I spied these *professional ones. They look something fierce!
What’s one thing we’d be surprised to find in your bag?
There is always a big tube of *chapstick in my sewing bag. I feel like I am constantly reapplying it, and hate to be without it! Plus, it can double as lotion on dry hands in a pinch.
We twin!! Lip balm in a MUST in my sewing kit. I’m currently using these cute *EOS ones, but have been wanting to give *this one a try!
When do you find yourself using your kit the most? (Travelling, on the sofa, attending sew-ins?)
I use my kit the most when I travel. I always pack my kit from scratch every time I take a trip. I used to have a kit ready to go with backup tools that I could grab, but found I was always missing my favorites. It's a fun part of getting ready for a trip, grabbing all my essentials from my sewing set up. When I do handwork on the couch, I typically make up a smaller kit in a small tray or pouch.
That’s such an interesting way of looking at the travel prep process, Jeni! There’s something about simple routines/ rituals that I love. I’ve been toying with the idea of creating a second sewing kit for when I’m at the lake, but then thought it was a little indulgent. Reading your comment has me thinking my current approach is working just fine 😉
What’s your favourite travel memory with your sewing bag?
Most years I get together with sewing friends in Wisconsin to sew for a weekend. I look forward to it all year long and we just spend the weekend eating, catching up and of course sewing!
Oh, gosh, that sounds lovely! I can’t wait to attend my first weekend sew-in. With the persistent lockdown, I’m not sure when that’s going to happen, but it’s something I’m definitely looking forward to!
Tell people where we can find you?
You can find me on Instagram @jenib320 and on my website www.incolororder.com.
Thank you so much for participating, Jeni! It’s been truly lovely getting to learn more about your path to quilting and giving us a full-on view at all the quilty goodies you stock in your toiletry bag!!
_________________________________________________________________________
For more What’s in Your Sewing Bag fun, check out these guests:
I’m always looking for ways to make the series even more enjoyable. Let me know if there are any burning questions you’d love to see added or if you have a guest you’d love to see featured. Share in the comments below!
Happy stitching!
xo
Shannon
_________________________________________________________________________
PS don’t forget to sign up for the weekly newsletter so you don’t miss out on any future WIYSB guests!
This post uses affiliate links. For more info, visit the FAQ page.
Happy New Year!
I’m so excited to be diving into a new year of making.
Since 2020 saw me away from the studio for almost half the year – whaaa? It was challenging to actually create new quilts – womp womp!
BUT - not having my sewing machine meant I had more time to write and share some super handy quilting tips with you!
Before diving into new quilty goodness, it’s always fun to look back and see what your top favourites of 2020 were.
Read on to see if your favourite made the list!
*This post contains affiliate links, meaning, at no additional cost to you, if you click through and make a purchase, I may receive a commission.
The What’s in Your Sewing Bag Series has been such a hit with you! I’ve had this idea for awhile and then back in 2019 made the decision that 2020 was the year I would kick it off. What I didn’t expect was what a fun project it would be to work on. Not only has the response from you been AH-mazing (yay!), but it’s reconfirmed just how awesomesauce fellow makers are. We truly are lucky to have such talented makers who are also super kind!
Lorna is the biggest sweetheart and continually inspires me with her eye for design and exploration. Read what Lorna keeps in her sewing bag here.
Also – I’m super excited to announce that What’s in Your Sewing Bag? will be back for another season in 2021 😉
Did you know I had zero knowledge about thread when I started sewing? Over the years, I’ve come to learn the importance of quilting with quality thread. But even more important is the FUN you can have experimenting with different thread weights. Check it out to see which thread weight is my new fave!
Pictured above is the Modern Aztec Quilt (5 colour version) - pattern available in the shop.
Hands down the BEST thing that I get from Instagram is the connections with you. Being self taught and not connected to a maker’s community, it was so refreshing and encouraging when I found our community on Instagram. While I’ve only actually met 1 person in real life, I count many as dear friends. Ange is one of those dear friends and it brings me joy knowing you’ve had a chance to get to know her too!
This was such an unexpected surprise to have my Double Windmill quilt featured in Curated Quilts Magazine. It was made even more joyful that it was the quilt I made for my dad that they had selected 😊 You can read more about how this pattern came to be in this post.
Pictured above is the Double Windmill quilt pattern - available in the shop.
One of the top questions I get asked is whether I quilt all my quilts.
I do.
All of them!
Mostly on my home sewing machine using a walking foot. Otherwise, I’m hand quilting (or combining the two!)!
Which is why I knew I had to share these tips with you!
These improv storage boxes are the BOMB! Not only are they super fun to make, but they’re an excellent way to use up your scraps and then store future ones! This design isn’t my genius, but that of Amanda Jean and you can find the pattern in *Sunday Morning Quilts (co-written with Cheryl Arkison).
You have no idea how excited I was to see Cloud Surfing in the top 10! And then I also found out the lap size got juried into QuiltCon 2021! Pinch me!
I’ve got more quilty curvy goodness planned in 2021, but first up is the new February Cloud Surfing workshop. There’s still a few spots left if you want to come and sew curves with me virtually 😊
Pictured above is the Cloud Surfing quilt (lap size) - pattern available in the shop.
I’m not sure whether moms are tough to buy for or you were just so excited to get some new handmade Mother’s Day gift ideas. Whatever the reason, it’s proof of how generous and thoughtful our community is.
Pictured above is the Double Chevron lumbar pillow pattern - available in the shop.
This one really resonated with you! I was so happy to see tips being shared too 😊 Just one of the many things I love about our community.
If you make a few quilts a year, you definitely want to check this post out.
Pictured above is the Modern Aztec Table Runner Pattern - available in the shop.
And the #1 blog post of 2020 was the 7-day Scrap Sorting Challenge – Tame Your Scraps! This totally happened by chance. I happened to be organizing my fabric back in early March and noticed my scraps were out of control. While filming an IG story, I threw out whether you wanted to get organized with me and…you did!
So, I pulled together the free 7-day Scrap Sorting Challenge so we could organize together.
And it was the BEST.
And then I had to leave the studio due to COVID.
I had intended to share the progress of the scrappy Plus Infinity quilt I made with my newly organized scraps, but she came together over several months with sporadic sewing sessions on a couple of short, unexpected returns to the city.
Then I finally got her machine quilted right before heading off for the holidays. I’ll share more about this one in a separate post soon, but this one was all about exploring, having fun and trying new quilty things! Oh, and using up those fabric scraps!
Pictured above is the Plus Infinity quilt pattern - available in the shop.
I can feel the need to get organized bubbling up again! If you need help taming your scraps, I encourage you to sign up for the free 7-Day Scrap Sorting Challenge.
Thank YOU so much for being here. Quilting just wouldn’t be the same without getting to connect and share the journey with you 😊
I’d love to know what you’d like to see from me next. Share it in the comments below!
Happy quilting!
xo
Shannon
_________________________________________________________________________
Never miss a post - sign up for the weekly newsletter.
This post uses affiliate links. For more info, visit the FAQ page.